Today, 77% of Agilists use Kanban boards. I'll say it again. Seventy-seven percent of those who conduct Agile projects use a Kanban board, according to the most authoritative study on Agile. This staggering percentage speaks for itself - followers of Scrum, Kanban, Scrumban, and any other Agile method or framework will vouch for the benefits of the Kanban board.

Image credit: State of Agile Report 2021
In the last two years, I have been using a Kanban board myself to manage my work and have never been happier. In my work experience, I have juggled several productivity tools, and Kanban boards truly made a world of difference for me.
So, let's walk through the simple process of how to make a Kanban board, which is a crucial part of the implementation of the Kanban method.
The Essence of a Kanban Board
As we have established, a Kanban board is a rather popular work management tool used by teams and organizations to visualize workflows, limit what's currently in progress, and maximize flow efficiency.
Some of the key characteristics of a Kanban board include:
✓ Kanban boards provide the means for visual control over the flow of work;
✓ Kanban boards "radiate" information across the organizations which improves team collaboration;
✓ Kanban boards help you optimize workflows by visualizing bottlenecks too.
The most basic Kanban board can be a simple physical board on the wall, separated by vertical columns with sticky notes representing work items. Nowadays, digital Kanban boards offer richer possibilities to their users to explore the full potential of the Kanban method.
A Kanban board can help teams across the entire organization to establish order in their daily activities. Kanban boards use Kanban cards, swimlanes, and columns to help teams commit to the appropriate amount of work to ensure on-time delivery.
How to Create a Kanban Board in 6 Steps?
Let's now go through the exact process of creating a Kanban board in six simple steps.
Step 1: Create a Basic Kanban Board
Don't get too crazy with your first Kanban board. Start small, scale later. What you need to do is create your first Kanban board and give it a name. Create the following four columns, which are the backbone elements of a Kanban board.
- Backlog - for all wild ideas you have.
- To-Do/Ready to Start - this is the place for all committed work (cards).
- In Progress - this is where the work items move once the team members commit to completing them.
- Done - this is the column for all completed work (cards).
- The Commitment Point on your Kanban board illustrates the point in your work process where the team signals that a given work item is ready to be started.
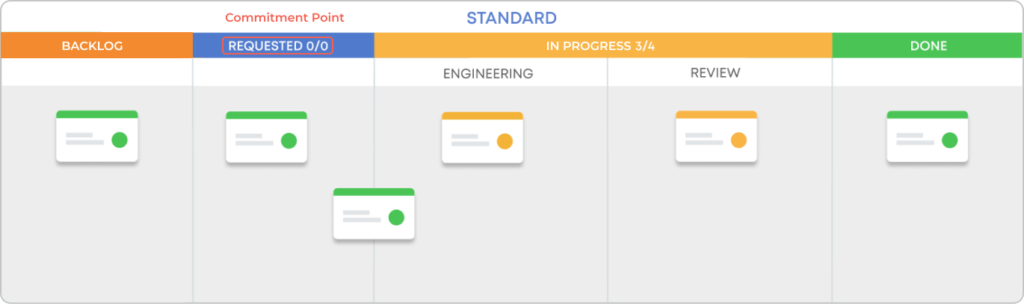
Basic Kanban board with a visual backlog, ready to start, in progress, and done columns of a work process
Step 2: Define and Map the Workflow
"To-do, doing, done doesn't tell you how you do what you do"
Nigel Turlow, expert in organizational design, author, and renowned speaker, Source: KanConf #2
Setting up a basic Kanban board is a good start; however, it's precisely that - a start. Proceed to map all additional columns that will further define your workflow. These columns should mirror your organization's workflow step-by-step. Choose columns where items are likely to move through and are meaningful to your team. This way, you will easily spot and address the problems in your work process.
For example, let's take the "In Progress" column from the basic Kanban board. Within this column, you can create a queuing column called "Waiting." This is an additional step that shows that the task you are working on needs further action from someone else, which could be a colleague of yours or a partner you are working with. Moving a card from "In Progress" to the "Waiting" column signals that your work depends on others and that you are available to start working on something else.
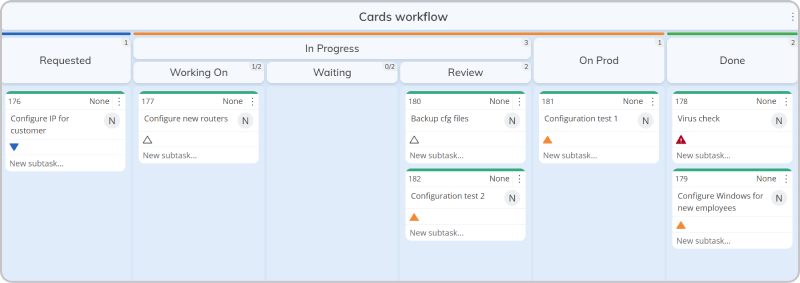
A Kanban board with multiple columns depicting an end-to-end work process
Step 3: Visualize All the Work
Next in the process of setting up your Kanban board is adding all the known work to it. Make a card or a note for every work item you know you need to do but have not yet started. You can add the new assignments to your board's Backlog, not in the To-Do/Ready to Start column. This step is essential because the primary goal of Kanban is to visualize all the work.
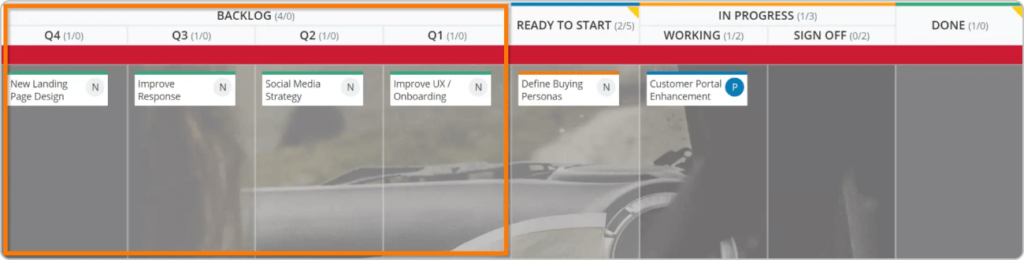
Adding all work items in the Backlog column of a Kanban board
Step 4: Make Work Policies Clear and Visible
Establishing the rules of how your process should run is critical for any Kanban board to work to your advantage. Having these policies or guidelines in a visible and accessible place on your board will make them universal to everyone on your team.
This way, you can establish a common agreement on using work categories, define when new work should start, when a task should be considered completed, SLAs, using colors on your board etc.
Make sure to create only a few work policies at first. Do not overdo it. Furthermore, strive to make your work policies well-defined and simple. They need to be visible and open to discussion. Remember that just like anything else in Kanban, work policies are also prone to continuous improvement.
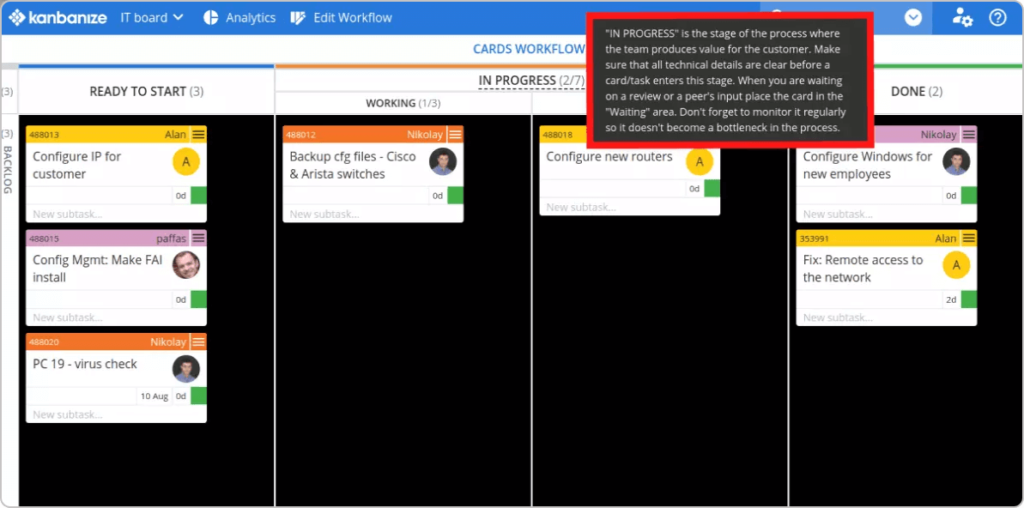
Visualization of work policies on a Kanban board
Step 5: Add Work in Progress (WIP) Limits
Kanban is focused on the continuous flow of work through a process. Capacity needs to be managed to make sure that work flows smoothly. Quit starting and start finishing is a famous saying in Kanban that emphasizes delivery. Remember that the more work items you have in your process, the slower your delivery becomes. That's why WIP limits should be clearly defined.
For example, if your team is of five people, the WIP limit for the In Progress column is recommended to be set to a maximum of 5 tasks allowed to be put in there. This means that each member is allowed to work on only one task at a time.
Many people neglect the importance of this step, as they think multitasking is possible. Multitasking isn't a possible act by our brain; what we do is context-switching between multiple tasks. Context switching is considered a waste in Kanban; it has a cost and should be eliminated by implementing WIP limits.

Visualization of WIP limits on Working and Testing phases of a work process using a Kanban board
Step 6: Establish a Feedback-Friendly Atmosphere
This step is one of the most important for properly developing your Kanban board and its workflow. As things change, the staff turns over, and products evolve, what originally fit well for the process may no longer meet those needs.
You should be open to teammates and stakeholders' feedback and suggestions and adjust the board accordingly. It doesn't matter if it is missing columns or they are too specific; these tweaks are simple and will eventually increase the use and benefits of any Kanban board.
Why Do You Need a Kanban Board?
A most underlined benefit of a Kanban board is the visibility it brings. Kanban boards and Kanban itself offer the unique ability to make work visible and, by that, elevate process constraints, identify system bottlenecks, show shortages of skills, etc.
As Professor Edward Tufte, statistician and author of The Visual Display of Quantitative Information put it, "..graphics are instruments for reasoning [about quantitative information.]". So, if you ask yourself how to build a Kanban board from scratch, sit down with your team and visualize all the steps you perform. Soon, the visualization itself will start "speak to you", so you can improve upon your work process.
A good Kanban board setup can help your team concentrate on the ongoing work and increase work efficiency. It can help you reduce the wasted time and work in your process by signaling where bottlenecks lie. Furthermore, the transparency of a Kanban board invites collaboration and engagement, so improvement settles in everyone's mindset.
Ways to Improve Your Initial Kanban Board Setup
Here are a few tips to consider once you already know how to create a basic Kanban board and you want to further explore the potential of establishing a work system where work is pulled and not pushed onto people.
Should You Categorize Different Work on Your Board?
Using types of work can help you divide your work based on select criteria and improve flow management.
Keep in mind that any workflow will change and improve with time as you and your team work together on the flow of your Kanban board. Adding swimlanes to your Kanban board will allow you to divide your board vertically based on priority, themes, areas of work, product components, etc.
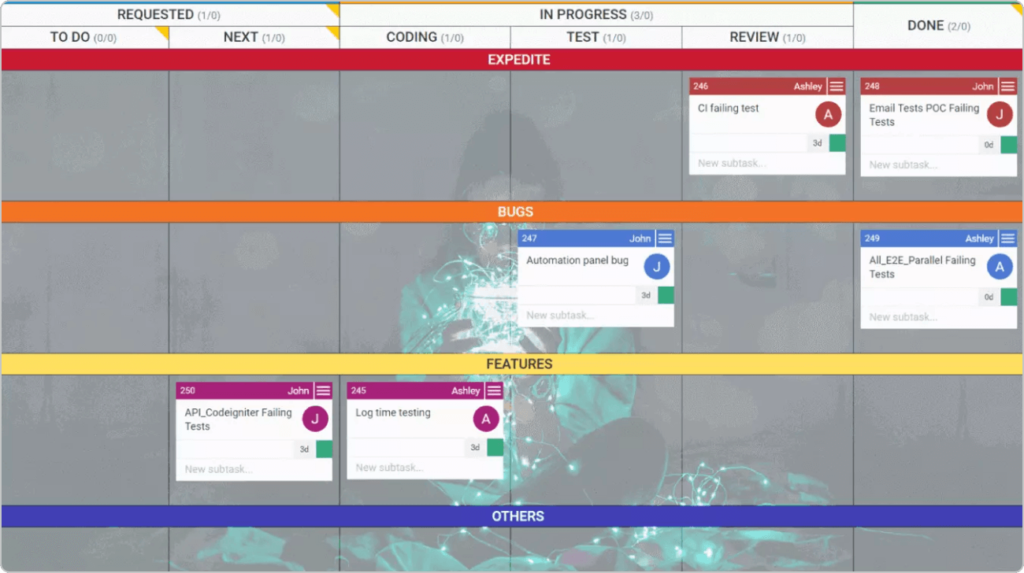
Making a Kanban board with a Review column and swimlanes for different work categories
Should You Visualize Blocked Work on Your Kanban Board?
As discussed, a Kanban board can help you visualize your work with unmatched transparency. The same goes for the work blocking your team's flow.
Using blockers on your Kanban board can help you visualize the problems stopping your team from finishing work. Gathering and analyzing reoccurring problems will allow you to narrow down the issues' root causes and improve the flow of your work process.
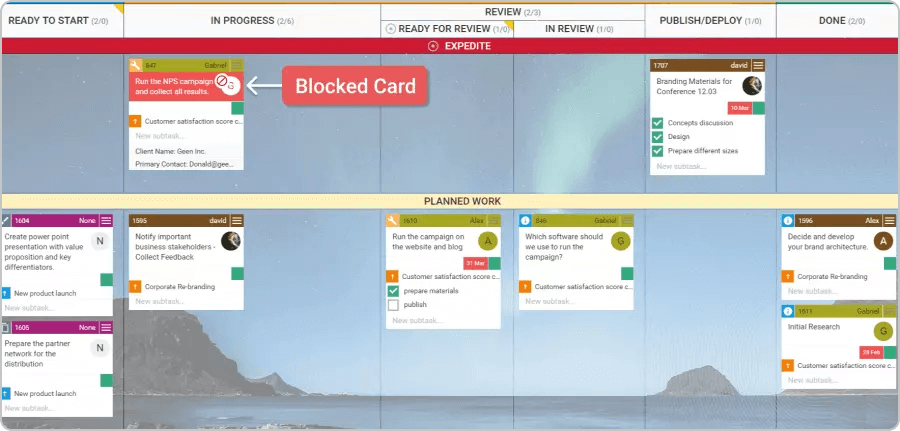
Visualizing blocked work item on a Kanban board
Should You Have a Kanban Board with Multiple Workflows?
Yes, you can use multiple workflows on your Kanban board. For example, you can create a Kanban board to visualize the work processes of different teams or a portfolio management board. Your DIY Kanban board might not be fit to handle this scenario, so an appropriate online Kanban board can help you with that.
The image below depicts the workflows of web design, development, and content development teams mapped on a single Kanban board. The board allows you to visualize the exact work process of each team, understand the cross-team dependencies, and track how work progresses over time.
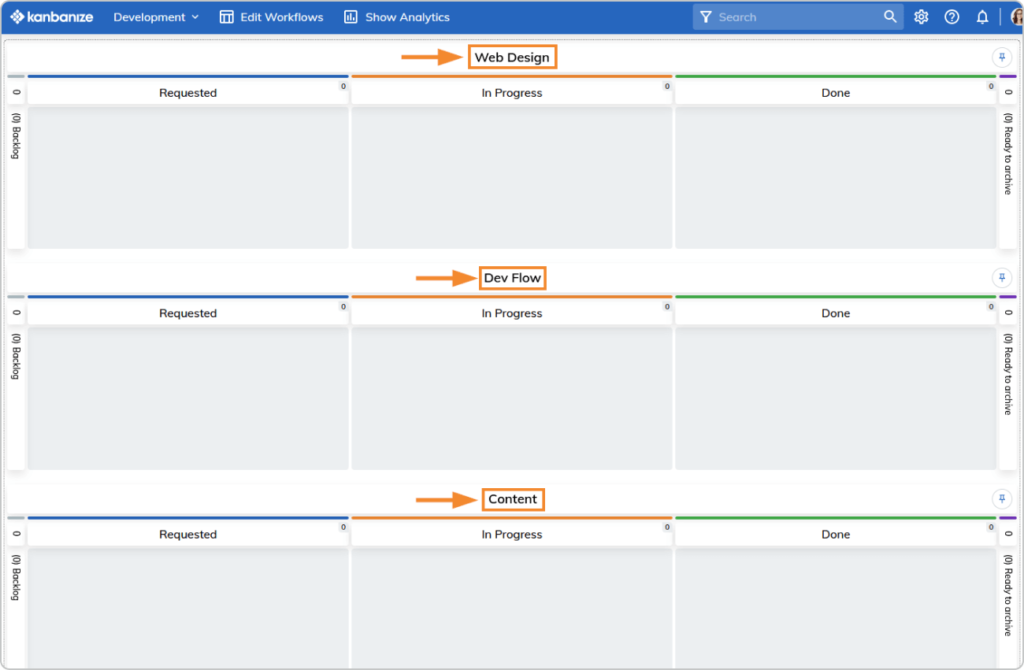
Visualizing the workflows of different teams on a single Kanban board
To wrap this up, we invite you to Kanbanize by Businessmap to set your first Kanban board in less than 5 minutes using the abovementioned six steps. Explore endless possibilities to create the workflow that meets your team's specific needs!
Try Businessmap Free for 14 days
Iva Krasteva
Content Creator Expert | Agile Practitioner | Kanban Certified
With a background in Intellectual Property, SEO, content writing, and training in Lean, Agile, and Kanban, Iva is an enthusiastic Agile practitioner who embraces collaboration and flexibility every step of the way. Driven by constant learning and knowledge and fascinated by people's creativity.