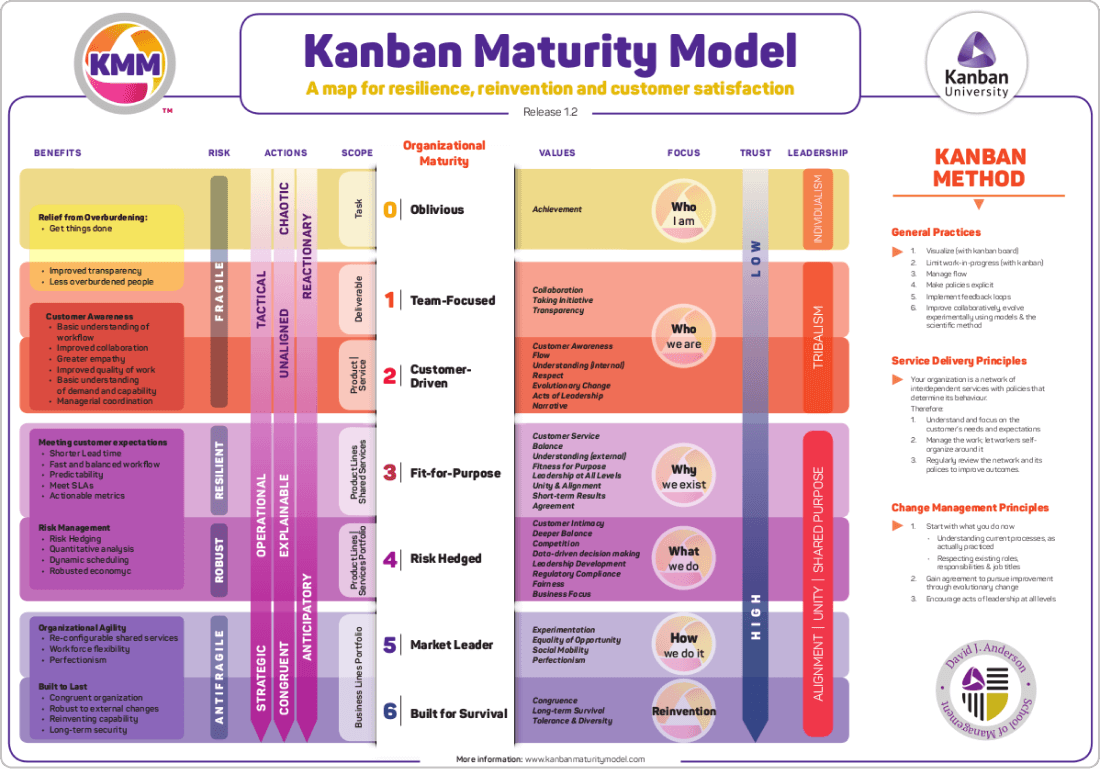
The Kanban Maturity Model (KMM) collects and summarizes a decade of experience applying Kanban across different organizations. The model can be a useful tool for organizations interested in developing their business and organizational agility.
It will provide you with a framework for scaling Kanban and evolving your process to achieve robustness and agility, ensuring your company’s long-time survivability.
KMM has 7 maturity levels, but before we explore the model in detail, let’s briefly describe its benefits.
At first sight, the KMM may look pretty complex. However, by advancing through the different stages, you will realize that it will help your organization in various ways.
For example, you’ll be able to relieve your staff from overburdening, make your process more predictable, and sustain a stable workflow. Besides, you’ll be capable of delivering faster to market, be more Agile, establish a shared purpose, and strengthen organizational values.
It is important to understand that each level of the model includes transition and core practices.
The transition practices will help you overcome potential resistance. By implementing them, you can facilitate the transition between maturity levels. The core practices are necessary to achieve the outcomes that define a maturity level. However, an organization at the lower level will resist or repel them unless some preparatory work is done first.

Without further ado, let’s discover the model and see how you can apply it in combination with Kanban software tools for maximum efficiency.
Maturity Level 0 – Oblivious
Maturity Level 1 – Team Focused
Maturity Level 2 – Customer-driven
Maturity Level 3 – Fit-for-purpose
Maturity Level 4 – Risk Hedged
Maturity Level 5&6 – Market Leader/Built for Survival
Maturity Level 0 – Oblivious
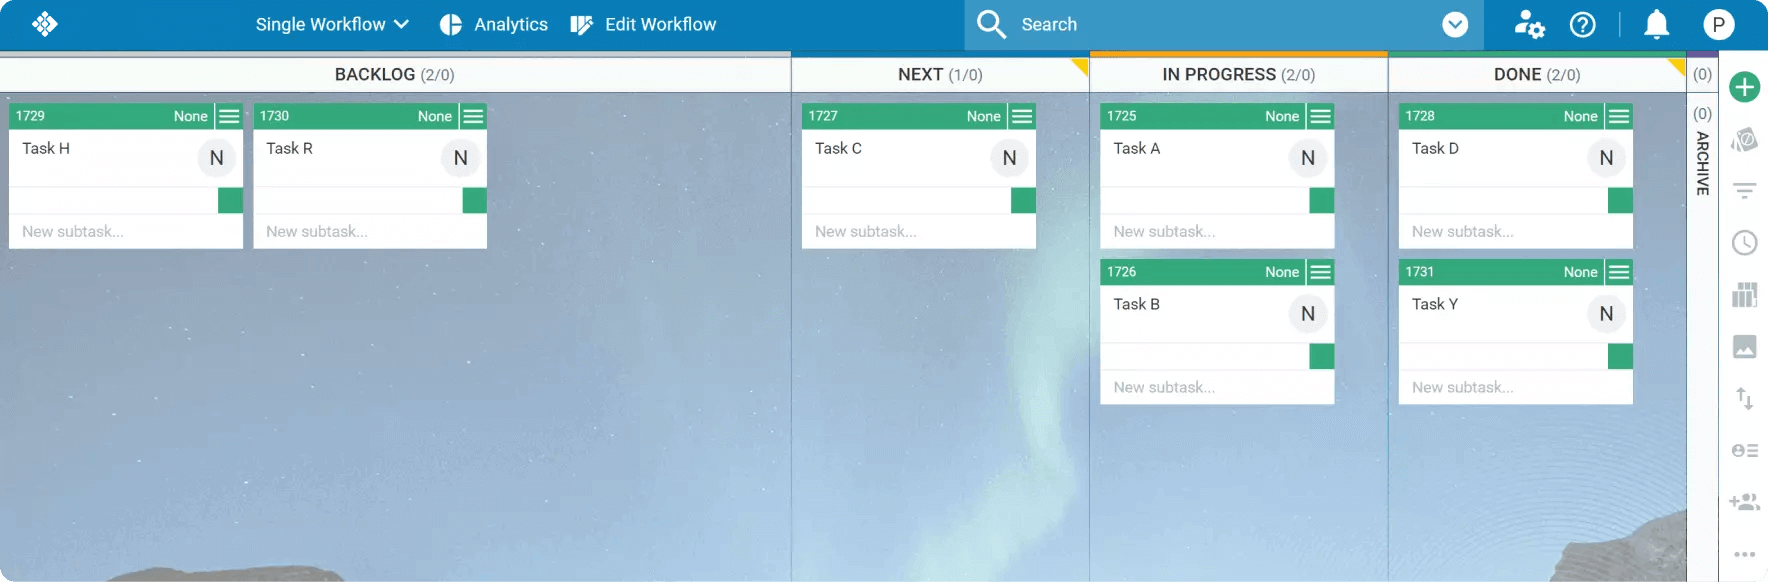
If your organization is not aware of the need for a structured work process, you are definitely at maturity Level 0. Most organizations at this stage don’t have a systematic approach to organizing the way they work, and it may seem difficult to apply the Kanban principles on a team level.
This is why you need to start by visualizing work on a personal level. You can either do it on a physical or a digital Kanban board.
Visualizing work items on a basic Kanban board
The purpose here is pretty simple. Individuals need to realize the benefits of visualizing invisible work and the need for limiting work-in-progress to become more productive.
Ultimately, your team will be ready to start the transition to maturity level 1 when individuals realize the need to prioritize what needs to be done next from the pile of tasks in their backlogs.
At this stage, it is crucial to realize that limiting work in progress helps you avoid multitasking and reduce lead times for delivering tasks.
If each of your team members is already here, you can go to the next phase.
Maturity Level 1 – Team Focused
At maturity Level 1, team members already have built the habit of using Kanban on an individual level.
After individuals start to recognize the advantages of simple workflow visualization, it is time to transmit Kanban's benefits from an individual to a team level.
Visualization
Workflow visualization at maturity Level 1 is related mostly to taking Personal Kanban on a team level. It is associated with 5 major practices:
- Visualize work for several individuals by means of an aggregated personal kanban board.
- Visualize discovered initial policies.
- Use avatars to visualize an individual’s workload.
- Visualize the work carried out by a team by means of a team kanban board.
- Visualize basic policies.
Transition
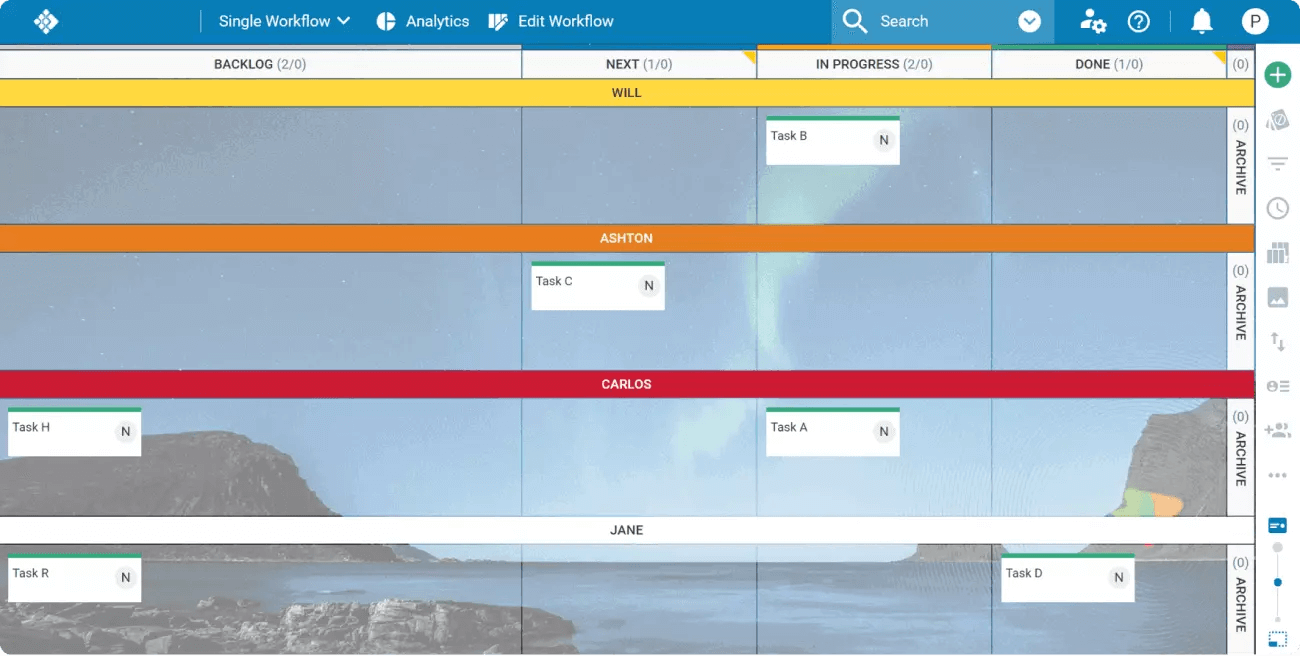
When initiating the transition, you should migrate all the work from the individual boards to a shared Kanban team board. In the beginning, it will be easier to differentiate between work items by using swimlanes. Each swimlane can be dedicated to a certain individual.
This way, team members will easily recognize their own tasks, but in the same way, they can easily see what others are doing.
Kanban Team board with individuals’ swimlanes
Still, there isn’t consistency in the work process, but you will notice increased team collaboration levels and inceptive shared responsibility culture.
You can do it on a physical Kanban board, but it will be much easier to build the shared Kanban board online with a few clicks. Plus, it will be much easier to collect workflow data, which you will need to advance further with the model.
Core Practices
If your team already has the confidence to share responsibility and common goals, it is time to remove individual swimlanes and apply avatars.
Using avatars to visualize a user's specific work items
So now, the whole team shares a common workspace, and tasks appear in common pools, but still, everyone is responsible for their own tasks. However, the team begins to acquire a clear understanding of the overall process.
An important step is to define and visualize initial policies. These are like norms or rules that the whole team agrees to follow for the sake of normal functioning and to improve the work process.
On a digital Kanban board, it will be effortless because they usually appear at the bottom of each column, and everyone can access them in a blink of an eye.
Limiting Work in Progress
At level 1, it is still relatively easy to apply WIP limits. Keeping in mind that each team member has their own swimlane at the beginning of this stage, it is normal, to begin with, personal WIP limits. The checklist for advancing toward maturity Level 2 consists of:
- Establishing per person WIP limits.
- Establishing team WIP limits.
Transition
While every team member has their dedicated swimlane, you need to limit the work that can be in progress for each individual. Taking this into account, you can try to calculate per-person WIP limits by simply observing, for example, the number of tasks that can be finished in 3 days, and this will be the WIP limit.
Applying WIP limits per user
In other words, if Janett can deliver 4 work items in 3 days, then her WIP limit will be 4. This way, you will prevent each individual from overburdening.
It is important to note that you need to consider the size of the work items that your team members work on before being able to set adequate WIP limits.
Core Practices
When you move to a joint Kanban board, it is time to set team WIP limits. It is always a good idea to back your decision up empirically, and this is why it will be much easier for you to use an online Kanban solution. Kanban software solutions usually collect historical data about your team’s workflow, and you can easily determine what the WIP limit should be.
For example, you can see your team's weekly throughput and set it as a WIP limit. In other words, if your online Kanban software tells you that your team completes 6 tasks per week, you can set it as a WIP limit.
Keep an eye on the reasons that cause exceeding the WIP limit. This will help you gradually decrease them until you reach a state where nobody is multitasking—another good reason to use Kanban software.
Visualization of all activities of a team per a given period
You can easily see “WIP limit exceeded” reasons with a few clicks and analyze them later. Additionally, you can also set business rules that raise alarms when limits are reached or exceeded. This can reduce the waste activities of moving and counting cards, especially if your team is big enough to generate a decent amount of tasks.
Finally, the great thing about team WIP limits is that they foster collaboration and encourage knowledge sharing.
Maturity Level 2 – Customer-driven
So far, your team has realized that using Kanban will boost collaboration and bring transparency to the work process. The next step is recognizing the workflow. In other words, the team starts to understand the way they do things.
Reaching this stage also means that the team probably starts to see and realize the need for a defined work process and how work items get done.
Visualization
Until now, your team used the Kanban board to visualize work tasks. However, from this stage, your teams will see the real value of the visualization practices.
Transition
Moving on to the core of ML2, you will first need to go through the following steps:
- Visualize progress using a horizontal position on an emergent workflow Kanban board.
- Visualize work types by means of card colors or board rows.
- Visualize blocked work items.
- Visualize work items aging.
- Visualize dependencies on another service or system.
- Visualize basic service policies.
First of all, an online Kanban solution will give you the freedom to swiftly apply any changes to your team’s workflow. Having this in mind, you may restructure your Kanban board and apply some principal stages of your workflow.
For example, if you manage a software development team, you can divide this delivery Kanban board into the following columns: Demand -> Specify -> Ready for Development -> Development/Test/Deploy -> Done.
Example of a software development team Kanban board
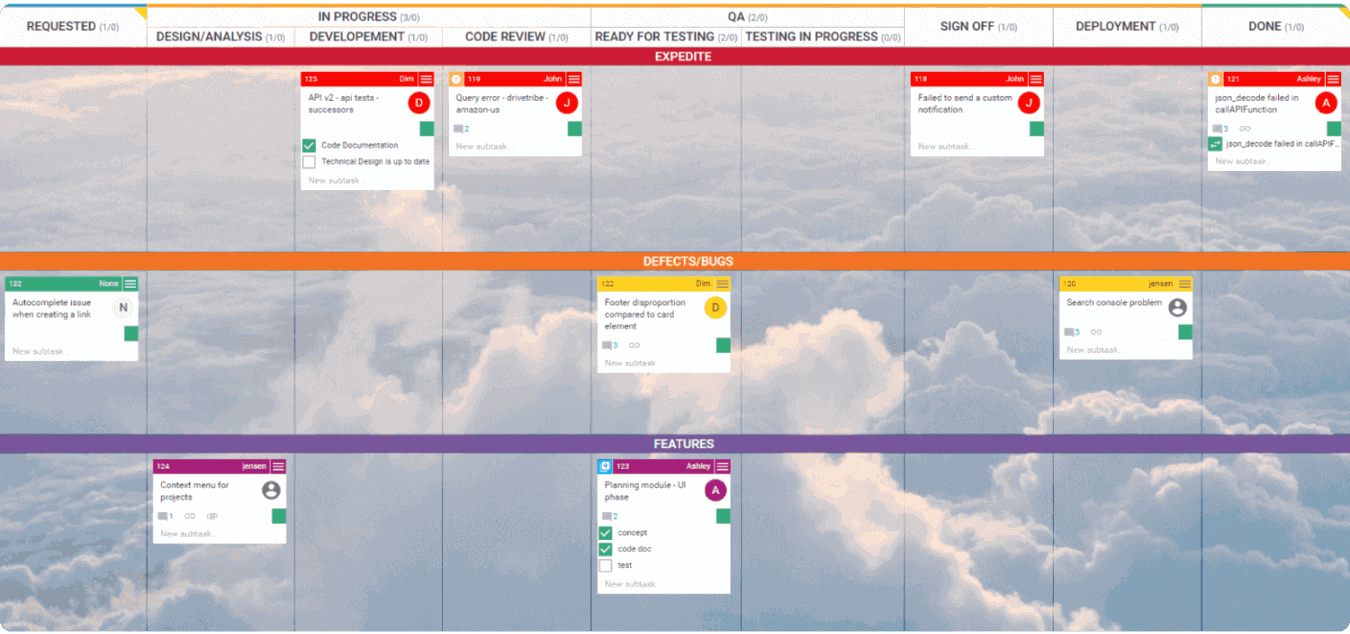
After this, you can apply color codes for the different types of work or use swimlanes for the same reason. For example, yellow cards will be bugs; blue cards will be features, and so on.
At this stage, it is essential to start visualizing blockers. Shortly explained, they are unexpected events that obstruct continuing work on a task.
If you use Kanban software, it will allow you to collect insightful data about different blocking reasons. At any time, you can extract a detailed report with a few clicks and analyze which block reasons cause the most process issues.
Search report of blocked cards
Being here already gives you the confidence to expand your board, and this is a good moment to slice the discovery stage of your work process or the backlog. Instead of just throwing all the ideas in one place (the backlog), you can separate the discovery stage into a few phases, which will help your team prioritize more efficiently and move tasks faster. But not just piling up ideas.
Visualization of the discovery stage on a Kanban board
Before we go to the last step, you first need to visualize individual WIP limits. Their goal here is to serve as secondary limits. Applying both team and individual WIP limits may prove to be necessary when more than one person works on a card. Imagine that the card has one assignee responsible for its completion, but multiple subtasks require other team members to assist. If the individual WIP limit is not in place, the assisting person complies with the team WIP limit but risks getting overburdened due to their participation in the processing of other cards.
Last but not least, you need to visualize the process policies. The policies should be clear and explicit. When using Kanban software, it will be straightforward to apply them.
For example, they can appear at the bottom of each column describing under what conditions a task should appear or be forwarded. Another example is that your team will be alarmed immediately if a WIP limit is reached or exceeded.
Visualization of work policies on a Kanban board
Core Practices
You are already at the core of maturity Level 2. Still, a lot to go, but the solid base you already have will help you build up a stable and smooth end-to-end flow. To do so, you need to follow the core practices:
- Visualize constant WIP (CONWIP) on an emergent workflow delivery Kanban board.
- Visualize concurrent or unordered activities with checkboxes.
- Visualize optional, unordered, potentially concurrent activities using two columns of checkboxes.
- Visualize optional multiple unordered, nonconcurrent activities performed by specialist teams using partial rows within a column on the board.
- Visualize defined workflow using a Kanban board.
- Visualize multiple services by means of an aggregated service delivery overview board.
Without further adieu, here is what you need to know.
Sometimes, several team members can work on a single work item. You can apply subtasks or checkboxes in these cases, and only when all subtasks are completed the task can be moved to the next column.
Furthermore, you can also use swimlanes to distinguish between tasks that need to be performed in parallel.
With the next step, you can apply swimlanes to split tasks that require different skills. For example, you can have separate swimlanes for different activities such as UI design, Security, etc.
Visualizing different types of work on a team-level Kanban board
This is also the right place to visualize defects and any other rework types. You can do this by using a specific color for this kind of task or a separate swimlane. This is an important step because it allows you to reduce wasteful rework activities.
Another important step is to apply constant WIP (CONWIP). At this point, you probably already divided the In Progress area of your Kanban board into different work stages. Putting a WIP limit on the whole In Progress area will help your team acquire a better understanding of the whole product development process.
At this point, it is important to begin upgrading your Kanban board on both the discovery and delivery stages. As mentioned earlier, the discovery stage, usually considered the backlog, is where ideas are born and later become actionable items and move to the delivery stage. Adding more stages to the workflow will help you see the whole value stream in detail and move work faster.
For example, a discovery stage of your workflow may start with a column named “Ideas”. This may be followed by the “Opportunities” column, where you pull ideas recognized for future development. You may have an analysis stage to divide work that will be pulled in the distant or near future.
The same principle applies to the whole workflow. The more you advance with Kanban, the more you will realize the need to put more columns. And this is not just for the sake of using columns, but to visualize all possible steps that a task can go through. This way, you will start identifying where work gets stuck, where work gets blocked most often, where the value is added.
Kanban board with multiple Workflows
Finally, before starting the transition to Level 3, you should outgrow Team Kanban and create a Portfolio Kanban board where your large projects are visualized as cards and broken down into assignments linked as children on your teams’ boards. Depending on the progress of the children, you should move the project initiative further towards Done.
Limiting WIP
In the process of maturing, you’ve learned how to limit work in progress on a personal and eventually basic team level. Still, to achieve a customer-driven state of Kanban implementation, you’ve got two steps ahead of you, one for the transitioning period and one associated with the core level practices:
- Establish constant WIP (CONWIP ) limits on emergent workflow.
- Establish WIP limits on an aggregated service delivery overview board.
Establishing WIP limits on an aggregated service allows you to achieve a smooth and balanced flow to collect services that involve one or more teams.
Next, you’ll need to apply a constant limit to the total amount of work in progress. Also known as CONWIP, this is a more advanced way of keeping your flow stable by keeping the same amount of items in progress all the time. If the limit is higher than your capacity, your team will be multitasking. If it is lower, then you’ll have team members idle occasionally.
Managing Flow
At maturity Level 2, the concept of flow becomes more heavily applied. 4 fundamental flow management practices need to become part of your work life:
- Define work types based on customer requests.
- Map upstream and downstream flow.
- Manage blocking issues.
- Manage defects and other rework types.
Transition
This maturity level's transition period consists of just one but significant step – defining work types based on your customers’ requests. Once you define them, be sure to visualize each type clearly on your Kanban board.
Using card types to define work types based on customers’ requests
You can use different card colors, markings, or any other way as long as there’s no chance of confusion. For example, in Kanbanize by Businessmap, you can define work type templates that automatically apply to freshly created cards of a specific type. Such cards are marked with a distinguishable icon.
Core Practices
At the core of maturity Level 2, the concept of Upstream Kanban appears for the first time. It is related to all the steps that are part of your process before committing to deliver an assignment.
The upstream states reflect the steps through which ideas or requests go before reaching commitment to be delivered. For example, these are generically Opportunities – Synthesis – Analysis – Ready to commit.
To advance further towards maturity Level 3, you need to start managing your blocking issues. Visualizing them is important, but you need to systemize blocking issues and discuss long-term solutions to commonly occurring blockers with your team.
Using blockers and stickers for managing blocking issues
A good way to classify your blockers is to prepare different avatars for all the problems you face. For example, if you are using our software platform, you can create custom blocker avatar templates. You can define a distinguishable icon and list any relevant information concerning the blocker inside.
Finally, to confidently say that you are at maturity Level 2 regarding flow, you need to start managing defects and other work types. A simple way to do so is to prepare a dedicated swimlane for work items of this sort that need to be expedited.
Visualization of work types using swimlanes
We advise you to place it on top of your board and make it as simple as possible (regarding process steps) so that cards can move quickly from Requested to Done. A good practice would be to give the highest priority to such tasks and adopt a policy that allows team members to drop anything they are working on to immediately fix the issue.
The only exception should be applied when everybody is working on items that are to be expedited.
Without going into detail about these practices, we would like to advise you to keep everything related to policies and services transparent to your team.
Continuing with the core visualization practices of maturity Level 2, it is important to visualize aging work in progress so you can maintain the efficiency of your workflow and react early to signs of trouble.
Agile work in progress (WIP)
Kanban software solutions are great for helping you with that because they provide a variety of features that allow you to visualize aging WIP, such as age indicator on each card, analytics dedicated to the purpose, and even the ability to change card color as it reaches a specific age.
Ensure you make the most of the visualization capabilities Kanban provides and continue developing the feedback loops related to maturity Level 2.
The last step towards achieving maturity level 3 is related to identifying sources of dissatisfaction and problematic policies.
We offer the most flexible software platform
for outcome-driven enterprise agility.
Maturity Level 3 – Fit-for-purpose
By the time you rise to maturity level 3, you should have a definition of a process, workflow, policies, and decision frameworks. It is important that your whole team agrees on all of them and understands how they help them achieve better results.
At this level, your main focus should be on evolving further your Kanban implementation of pretty much all of the 6 core practices.
Visualizing Workflow
As you start to outgrow maturity Level 2 and begin the transition from a customer-driven to a fit-for-purpose process, the practices related to visualization advance upstream.
Transition
The transition to maturity Level 3 is in the form of 6 action items:
- Visualize "ready to commit" status, also known as "ready to pull".
- Visualize request acceptance criteria, also known as entry criteria.
- Visualize workflow and teamwork items by means of an aggregated team kanban board.
- Visualize class of service using ticket colors, board rows, or ticket decorators.
- Visualize parent-child and peer-peer dependencies.
- Use the parking lot to visualize dependent work requests of another service or system currently waiting or blocked.
To initiate the transition, you should set up a new column on your Kanban board dedicated to items that are ready to be committed. This step aims to distinguish between requested items that are ready to be pulled in progress and all the rest that await their turn sometimes in the future. Logically, you should put it right before your first progress step.
Next, you need to make sure that your team sticks to that order and doesn’t pull items that are requested but not placed in the upstream column. The best way to do so is to make it explicitly clear what should happen with the items in the column. It is wise to give it a name such as “Next”, “Ready to Start”, “Ready to commit”, “Ready to pull” or something similar.
Also, it would be wise to visualize the definition of ready, or if we stick to the Kanban terminology – pull criteria. The best place, of course, is on the board itself.
Visualization of a Kanban board at Maturity Level 3
When the first couple of steps toward transitioning to fit-for-purpose Kanban implementation become a natural part of your day-to-day work life, you should try combining multiple boards of teams with closely-related functions (e.g., Development and QA).
Your goal here is to make the handover of work more natural and keep tasks that both teams need to process in a single place.
This can be enhanced even further when using a Kanban software solution because of the automation features present in some tools.
For example, inside our work management platform, you can set up the system to send a notification to the QA team as soon as a card becomes available for testing.
Next, you may draw a few swimlanes to separate your projects and keep all assignments related to them grouped.
To conclude the transition toward maturity Level 3 (with respect to visualization), you should visualize the dependencies between tasks on your board and dedicate a column to tasks waiting on external stakeholders.
Visualizing dependencies on a physical board is quite tricky and usually requires treads of fabric connected to each other.
However, there’s an easier way available for teams that are not afraid to take their Kanban implementation digital.
Some online Kanban boards, including the ones available in our platform, come with features dedicated to visualizing a variety of card dependencies like:
- Parent
- Child
- Relative
- Predecessor
- Successor
To reach maturity Level 3, your goal should be to make transparent the dependencies between parent-child and peer-peer assignments.
The most simple explanation of this type of dependency is a parent assignment consisting of one or many child cards that need to be completed before the parent can be considered done, or you can begin processing it (if there’s further action to be taken).
On the other hand, a peer-peer relationship is when two tasks are related to one another, but neither is superior.
Hierarchy visualization of Linked Cards
When using an online Kanban board, you won’t have to deal with the thread situation but instead, just connect the cards through the tool's dependency mechanism and monitor the child's progress on the parent card itself. Not only that you’ll save a lot of time trying to keep your board neat, but once again, you can rely on automatic notifications to let you know that progress has been made.
As mentioned a few paragraphs above, the last transition step is dedicating a space on your board to tasks that await external stakeholders' action. You can be very flexible here and do it in several ways, but the most popular ones are:
- Dedicating a column on your board somewhere in the progress section
- Drawing a vertical line across one or a few of the processing columns, indicating that everything below the line is waiting on someone outside of your team
Core Practices
If you’ve successfully implemented everything you’ve read so far related to visualizing work, then you are just about to arrive confidently at maturity Level 3 and proudly say that you have a managed workflow visualization. Still, there are a few core practices that you need to adopt at this level:
- Visualize ideas development by means of an upstream (discovery) kanban board.
- Visualize discarded options on an upstream (discovery) kanban board.
- Visualize replenishment signals.
- Visualize pull signals.
- Visualize pull criteria (also known as "pull policies", "definition of ready", "exit criteria").
- Visualize available capacity.
- Visualize target date or SLA.
- Visualize failure demand versus value demand.
- Visualize aborted work.
Continuing upstream, you need to enhance your Kanban board to give you a better view of the available options that await your team to work on.
To do so, you need to break down the “Requested” section of your board further and add a few steps between the task initiation on the board and the commitment step.
Breaking down the “Requested” area for better visualization of the work items that await to be worked on.
The steps should be dedicated to defining an assignment and analyzing the requirements to finish it.
You would do well to dedicate some space for visualizing abandoned ideas by drawing a separate swimlane for such cards below the board's upstream section.
Next, you should make sure that your team knows when new tasks should be pulled downstream toward commitment. A simple way to do so is by putting a minimal WIP limit on your upstream columns.
Ensure that there’s an indication when a task should be pulled further downstream (e.g., using card tags), and keep the board up to date, so there’s no chance to have idle capacity too often.
You can rely on software solutions to help you with the next visualization practice of maturity Level 3, which requires you to visualize your assignments' target dates or SLA. Their added functionalities will keep your team aware of approaching deadlines without you having to remind them.
Depending on your software choice, you may have different features like a card deadline indicator, email notifications for approaching deadlines, changing card color automatically when a deadline is close by, etc.
Although Level 3 has some serious focus on the upstream part of your workflow, there’s no absence of action to be taken on the downstream as well.
Like it or not, waste is an inevitable part of any process, and sometimes work in progress has to be abandoned due to some circumstances.
As a result, it is a good practice to visualize work that has been worked on but forsaken on your board. You can either dedicate a column for such cards or simply put a tag indicating that they haven’t been finished and put them to “Done”, so you can learn from each failure and avoid making a mistake twice.
Before you are ready to initiate the transition to maturity Level 4, there are a final couple of things that you need to make part of your daily office life.
Using Kanban swimlanes to visualize different classes of service
One of them is visualizing different types of work or classes of service on your board. You can do that either with card colors or dedicated swimlanes. The second option is more popular because in any kind of Kanban implementation, the higher the card’s position on the board, the higher its priority is.
Therefore, when distinguishing between different classes of service or types of assignments, it is a good idea to put the type of work with the highest priority on the top swimlane and continue downward using this logic.
Finally, before starting the transition to Level 4, you should further advance your Portfolio Kanban implementation by turning your portfolio board into an Earned Value portfolio Kanban board to visualize project progress and schedule or budget risk.
Limiting WIP
Similarly to the previous maturity levels, when advancing toward fit-for-purpose Kanban Implementation, you need to enhance the already established practices for limiting work in progress. However, once you’ve achieved a customer-driven level of limiting WIP, you can proceed to maturity Level 3 without having to go through a transition.
There are 6 practices related to limiting work in progress at this level:
- Establish activity-based WIP limits.
- Use an order point (min limit) for upstream replenishment.
- Use a max limit to define capacity.
- Bracket WIP limits across different sub-states.
- Bracket WIP limits across different activities.
- Create a full Kanban system.
Establishing activity-based WIP limits allows you to manage team capacity, considering the types of work items that comprise your workflow. You just have to put a maximum limit on the number of tasks from a given type that can be in progress.
Second, you need to establish a minimum limit for the upstream replenishment of tasks. Your goal is to have a constant stream of ideas for work items advancing to your commitment point. The minimum WIP limit will signal you that your pool of ideas needs to be replenished as soon as your team hits it.
After you set up a replenishment point, you need to ensure that you don’t overburden the team that operates upstream. In other words, you have to put a maximum limit on the cards that can reside in any upstream column.
Setting a maximum limit on the work items in the upstream process of a workflow
The last practice associated with limiting work at maturity Level 3 is putting a bracket WIP limit for your workflow's different stages. For example, if your development and QA teams work on a single board, you need to put separate limits to their stages, combining all columns related to a team.
Managing Flow
Maturity Levels 0-2 should have allowed you to lay a stable foundation for managing a complex workflow. Still, when you start transitioning toward maturity Level 3, there’s plenty to do in this regard.
Transition
The transition to level 3 consists of 11 practices in total. As most of them are tweaks to your management style, we’ll just mention 7 of them and pay attention to those related to using Kanban boards in particular.
The 7 practices listed in the order they should be implemented are as follows:
- Organize around the knowledge discovery process.
- Defer commitment (decide at the "last responsible moment").
- Use the cumulative flow diagram to monitor queues.
- Use Little’s Law.
- Gradually eliminate infinite buffers.
- Report rudimentary flow efficiency.
- Actively close upstream requests which meet the abandonment criteria.
Implementing all of these practices is necessary to step firmly on maturity Level 3. Once you’ve managed to organize your team around specific services and have deferred commitment, it’s time to start managing your workflow's stability.
Managing workflow’s stability using a Cumulative flow diagram
There’s hardly a more suitable tool for this purpose than the cumulative flow diagram (CFD). It is an advanced analytic available in online Kanban boards that provide a concise visualization of the three most important metrics of your flow:
- Cycle time
- Throughput
- Work in progress
Its main purpose is to show you how stable your flow is and help you understand where you need to focus on making your process more predictable. It gives you quantitative and qualitative insight into both past and existing problems and can visualize massive amounts of data.
Although the CFD might look confusing at the beginning, it is quite simple, really.
There are 3 states of your workflow that the chart can visualize:
- The bands are widening – more work items are entering the workflow than those leaving it.
- The bands are progressing in parallel – your workflow is stable, and there’s a balance between tasks getting started versus going to Done.
- The bands are tightening – your team is finishing more work than they’re starting, and you’ve got the idle capacity.
This simple visualization is one of the most serious advantages of online Kanban boards. It provides you with essential workflow data that’s nearly impossible to replicate with physical Kanban boards.
At this point, you’re halfway through the transition. After you’ve tamed your workflow using a CFD, you need to put into practice some Kanban planning using Little’s Law.
It is quite a simple way to forecast your assignments' delivery time by dividing WIP by lead time. If your workflow is predictable, then Little’s Law can let you breathe easily when committing to a deadline. If not, then you are not ready to take this step.
Next, you need to remove the infinite buffers from your process and leave only the ones that ensure a smooth flow of work without slowing it down too much.
To understand the value of removing buffers from your system, you need to be vigilant of your flow efficiency. Therefore, it is no surprise that the next step in maturing is related to this.
You can measure flow efficiency using two methods:
- Calculate it for each work item by dividing work time by lead time and then combining the results to get median flow efficiency.
- Use a Flow Efficiency chart.
Flow efficiency charts automate the whole process listed in point 1 and allow you to focus on actually using the data inside.
To conclude the transition, you need to make a habit of actively closing upstream requests which meet the abandonment criteria.
Core Practices
Once you are done transitioning, you have plenty of work ahead to achieve a truly managed workflow:
- Develop a triage discipline.
- Manage peer-to-peer and parent-child dependencies.
- Use a two-phase commit.
- Analyze and report aborted work items.
- Use classes of service to affect the selection.
- Forecast Delivery.
- Apply qualitative Real Options Thinking.
- Apply Service delivery manager role.
- Apply Service request manager role.
Although all six items on this checklist are important, you need to pay special attention to managing dependencies. Failing to do so effectively can easily revert you to maturity Level 2.
Dependencies increase risk. Therefore, their proper visualization and management are important for meeting customer expectations.
Hierarchy visualization of Linked Cards
As mentioned earlier in this article, visualizing dependencies on a physical board is quite difficult, which is perfectly valid for managing them as well. The authors of the KMM suggest the following tactics for managing dependencies:
- Use a separate Kanban board for managing dependencies on third parties, such as suppliers, other teams, specialists, or external organizations.
- Plot dependencies on a dependency matrix explicitly indicating the reliance of a work item on other items or teams.
- Periodically analyze the dependence-related blockers. Identify the causes and take actions to prevent them from occurring in the future.
- Have a periodic meeting with representatives of each kanban system regarding communication and resolution of issues relating to dependencies
- Escalate dependencies that cannot be managed within the service delivery workflow team to the Operations Review
If you decide to take your Kanban implementation digital, you can easily monitor dependencies' progress and get notified as soon as problems occur.
At maturity Level 3, you learned how to measure flow efficiency. If you are using Kanban software, you can make the transition from measuring to collecting and reporting with just a few clicks and gain momentum in the process of maturing.
Once again, you need to pay attention to your process's buffers and use them to smooth your workflow. It is wise to place a buffer column (or multiple ones) before a process bottleneck to prevent it from clogging your process.
Visualization of commitment points on a Kanban board
Two-phase commitment allows you to manage customer expectations. By implementing a second commitment point in your workflow, you’ll be able to flow a task downstream without committing to a specific deadline from the very start.
This way, as soon as you’ve reached a point of your process where you can commit to a delivery date, you do so with higher confidence and keep the risk of failing to deliver value at the promised time low.
Making Policies Explicit
At maturity Level 2, you defined your initial process policies. Still, as soon as you start ascending to fit-for-purpose Kanban implementation, you’ll have a new checklist to tackle before reaching it.
Transition
Transitioning to maturity Level 3 will require you to:
- Establish an explicit purpose of metrics (Fit-for-purpose metrics).
- Define initial request acceptance policies.
- Define policies for discarding requests upstream.
- Define criteria for aborted work.
- Define basic classes of service based on the qualitative cost of delay.
There’s little reason to dwell on why you need to establish the explicit purpose of the metrics you choose to monitor as KPI, so to summarize it, it is enough to say that by doing so, you will be able to distinguish between true performance indicators and vanity metrics.
By establishing initial request acceptance policies, you’ll be able to reduce the lead time of your tasks and provide you with time to define the assignment before committing it. After you’ve decided on what your request acceptance policies are, just put them as descriptions under each column on your board, they apply to.
Visualization of work policies on a Kanban board
On the other hand, defining work request abandonment policies will allow you to drop committed tasks that have not been started for a certain amount of time and are not likely to be processed as well. Once again, you can list the abandonment criteria below the column they apply to.
We’ve already covered the upstream practices for flowing work down toward commitment, so logically you need to define a specific replenishment point, which, when crossed, there’s no going back from. Typically this would be the last “Requested” column of your board.
Core Practices
Once you are done transitioning, you need to stay firmly at maturity Level 3 by:
- Establishing pull criteria.
- Establishing a commitment point.
- Establishing a delivery point and delivery buffer.
- Establishing customer acceptance criteria for each work item or a class of work items.
Pull criteria are important for making sure that you start only tasks that you are actually ready to process. They may vary for different classes of services, so you should take your time when establishing them.
A simple way to visualize pull criteria is to list any criterium that you have as a subtask on the card, visualizing the task of interest.
Establishing a delivery commitment point is the next thing you need to do on the way to maturity Level 4. The simplest way to do so is to dedicate a column on your Kanban board right before delivering value to the market. It can be the “Done” column or the last “In Progress” stage (e.g., Ready for deployment).
Afterward, you should proceed to establishing customer acceptance criteria and defining classes of services. Classes of services allow you to manage work depending on your customers’ expectations.
Visualization of classes of services using swimlanes
The first four Kanban practices are strongly addressed at maturity Level 3. The last two – Implementing feedback loops and evolve experimentally are mostly related to team communication. We don’t think we can build on the detailed explanations the authors of the model Mr. David Anderson and Ms. Teodora Bozheva have provided so that we won’t be going through them.
Still, we can’t stress out the importance of identifying sources of delay, which are part of the transition period toward maturity level 3 regarding evolving experimentally.
Sources of delay can be categorized into two main types:
- Common (queuing, buffering, multitasking, etc.)
- Special (dependency on another service or external vendor, or waiting for permission, approval, audit, compliance verification, budget approval, etc.)
In most cases, you’ll use a sticker that shows that a task is blocked, and if you are using a software solution, it will probably explain why. Take your time to study these sources and look for ways to avoid them in the future.
Maturity Level 4 – Risk Hedged
Kanban Maturity Level 4 is characterized by a risk hedged process and data-driven decisions. It is characterized more by adopting Kanban Cadences and adopting the Fit-For-Purpose Framework than specific Kanban board designs.
Still, there’s some serious progress to be made regarding workflow visualization and managing flow. While ascending from ML3 to ML4 and above, the model becomes more focused on evolving your management practices and the process itself.
Visualizing Workflow
Unlike levels 0 through 3, workflow visualization practices are not the majority of factors that drive organizational maturity forward at ML4. Both the transition and core practices are by far fewer than before, yet their significance is not diminished.
Transition
To pass the transition and reach maturity Level 4, you need to start:
- Visualizing local cycle time
- Using ticket decorators to indicate risks
- Visualizing risk classes with different swimlanes
- Visualizing split and merge workflows
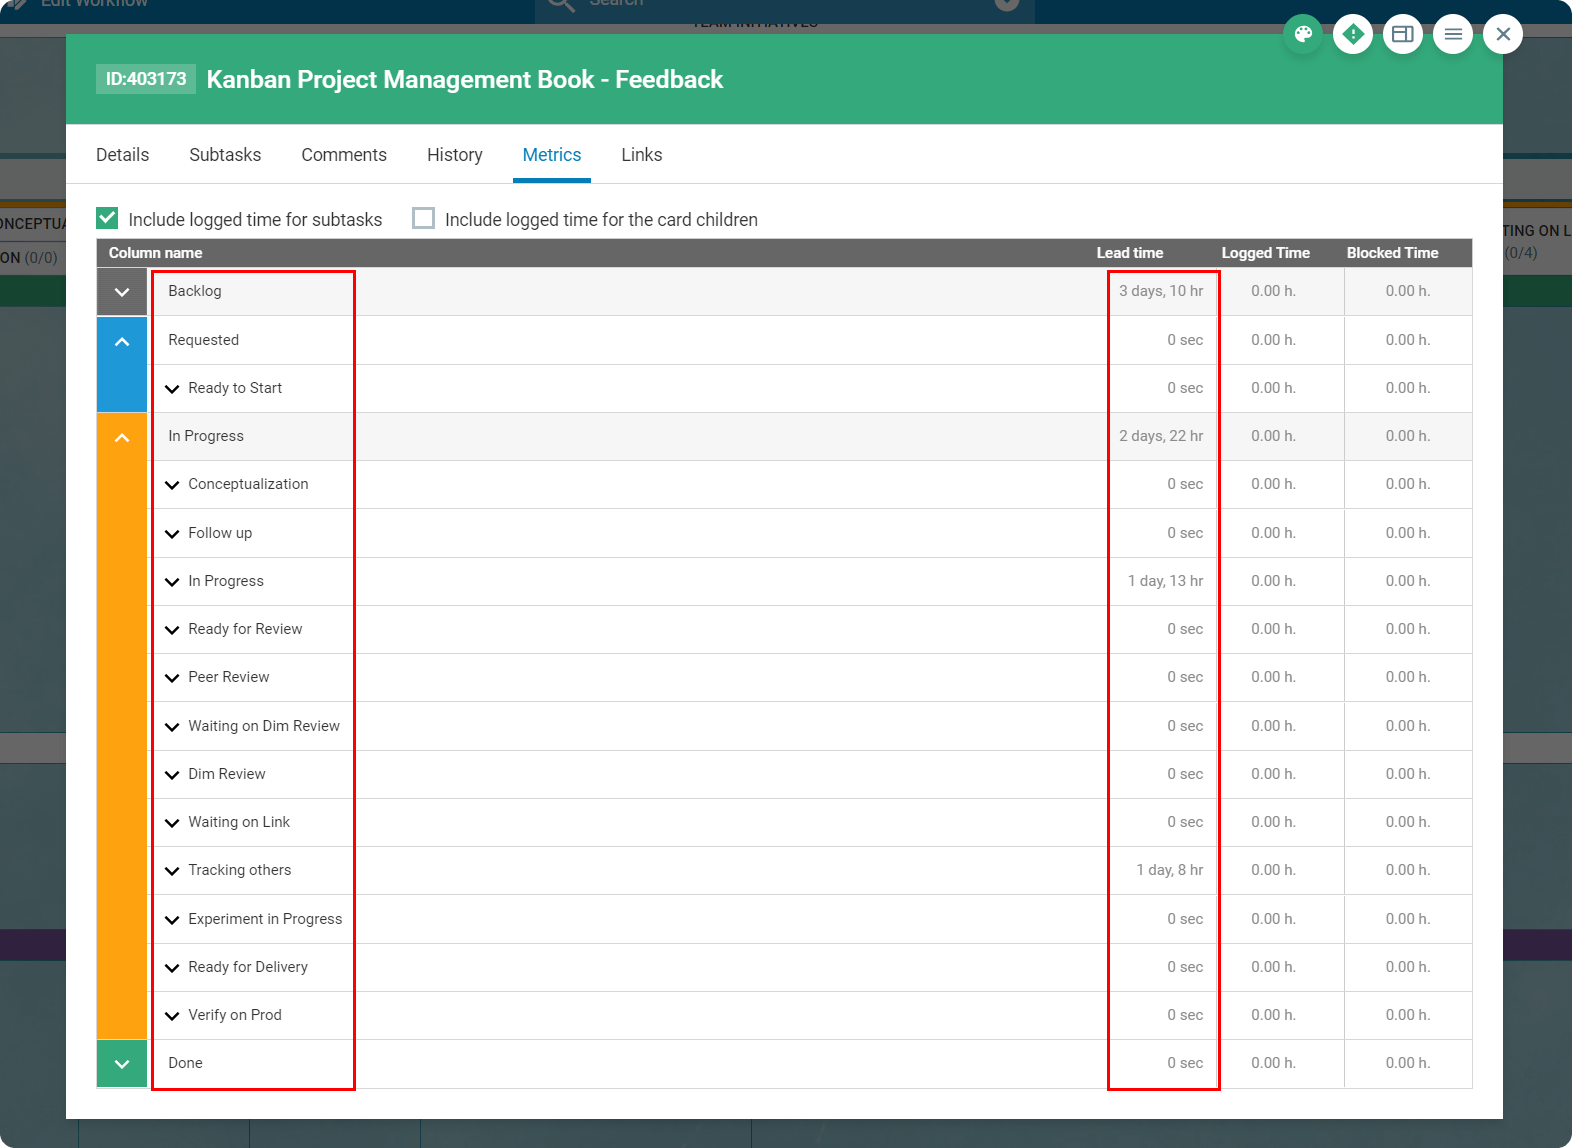
Local cycle time is the time a work item spends in a specific activity or a defined sequence of activities. Simply put, it is the amount of time that a card spends at a certain stage of your process (e.g., development).
To visualize the local cycle time, you need to indicate how much time a task spends in each process stage. Some teams that stick with physical implementation even at this level mark with dots the days a card has spent in any given column.
As this is not a commonly-developed feature in online Kanban boards, teams that prefer this way of method’s implementation may write inside the card’s description the date a card enters a stage and the date it leaves it.
Visualization of lead time spent in each process step
Next, you need to indicate risks by applying card decorators. This can happen simply by using different colors for tasks depending on the risk of missing your targeted SLA.
Even further, if you’ve adopted an online Kanban board solution, you can use more sophisticated means such as automatically changing colors when you get close to a deadline or pass it. Also, if using Kanbanize by Businessmap, you’ll have a variety of stickers that can help you indicate risks even more easily.
Another option is to visualize different risk classes with separate swimlanes. The logic is pretty simple, define multiple levels of risk, and dedicate each of them a swimlane. Visualize tasks on the swimlane they are best attributed.
The last transition step is to splitting and merging workflows. It is important to understand here that this relates to splitting a task into a couple or multiple cards that can be processed simultaneously so your team can work on them in parallel.
Visualization of a project broken down into work items across different teams via swimlanes
A simple way to do so using Portfolio Kanban software is to visualize large tasks as initiatives and break them down into quick-to-process cards that can be delegated to your team. As a result, when all of them are finished, the initiative can be considered completed and moved to Done.
Core Practices
If you’ve done everything we’ve covered so far about visualization, congratulations! You are at maturity Level 4. At this stage of the Kanban Maturity Model, you’ve got 3 objectives to continue the ascend further regarding visualization:
- Visualize WIP limits on the dependencies parking lot
- Visualize waiting time in the dependencies parking lot
- Visualize SLA exceeded in dependencies
At the core of maturity Level 4, you’ve got to put your dependencies parking lot under complete control. Here, you need to put a maximum WIP limit to the column serving the purpose and visualize this limit clearly on top of the stage.
Visualizing WIP limits on the dependencies parking lot
The next step is to identify the work types and decide how much capacity you want to allocate to each of them. You can use swimlanes to visualize the work types and create a WIP limit for each lane corresponding to the allocated capacity.
Last but not least, you can visualize the classes of service using different ticket colors or swimlanes. Then you have to decide how to distribute the total WIP in the system across all classes of service.
Manage Flow
Managing flow is the most heavily-addressed Kanban practice at ML 4. There’s a total of 12 steps to be taken to progress from a fit-for-purpose Kanban implementation to a risk hedged one in regards to flow management.
Transition
The transition period features 6 steps to be taken for advancing flow management:
- Collect and report detailed flow efficiency analysis.
- Use explicit buffers to smooth flow.
- Analyze to anticipate dependencies.
- Establish refutable versus irrefutable demand.
- Use classes of dependency management according to the cost of delay.
- Use classes of booking in a dynamic reservation system.
The last two items on the transition checklist are more process and less Kanban related so that we won’t go over them in detail.
Core Practices
At the core of the practices that comprise Level 4 of the Kanban Maturity Model in regards to flow management lie 7 to-dos:
- Determine the reference class data set.
- Forecast using reference classes, Monte Carlo simulations, and other models.
- Allocate capacity across swimlanes.
- Allocate capacity by the color of the work item.
- Make appropriate use of forecasting.
- Assess forecasting models for robustness.
- Use statistical methods for decision-making.
Going straight to point #2 on our list, Monte Carlo simulations are among the most reliable ways to forecast process performance, relying on past data. With their help, you’ll be able to forecast cycle time and throughput based on a large number of random simulations using past performance data.
Example of Monte Carlo: How many?
Building on this, you’ll be able to manage and experiment with your capacity in a better way and test allocating capacity across swimlanes or types of assignments (if using colors to differentiate them).
Be sure to make the most of forecasting and stop relying on gut feeling but on statistical methods for making data-driven decisions.
Once again, the rest of the Maturity Model’s practices are a bit more empirical. You can learn more about them in the book “Kanban Maturity Model: Evolving Fit-for-Purpose Organization” by David J. Anderson and Teodora Bozheva.
In the rest of the article, we’ll just do an overview of what you need to do to reach the highest Kanban maturity levels – “Market Leader” and “Antifragile”.
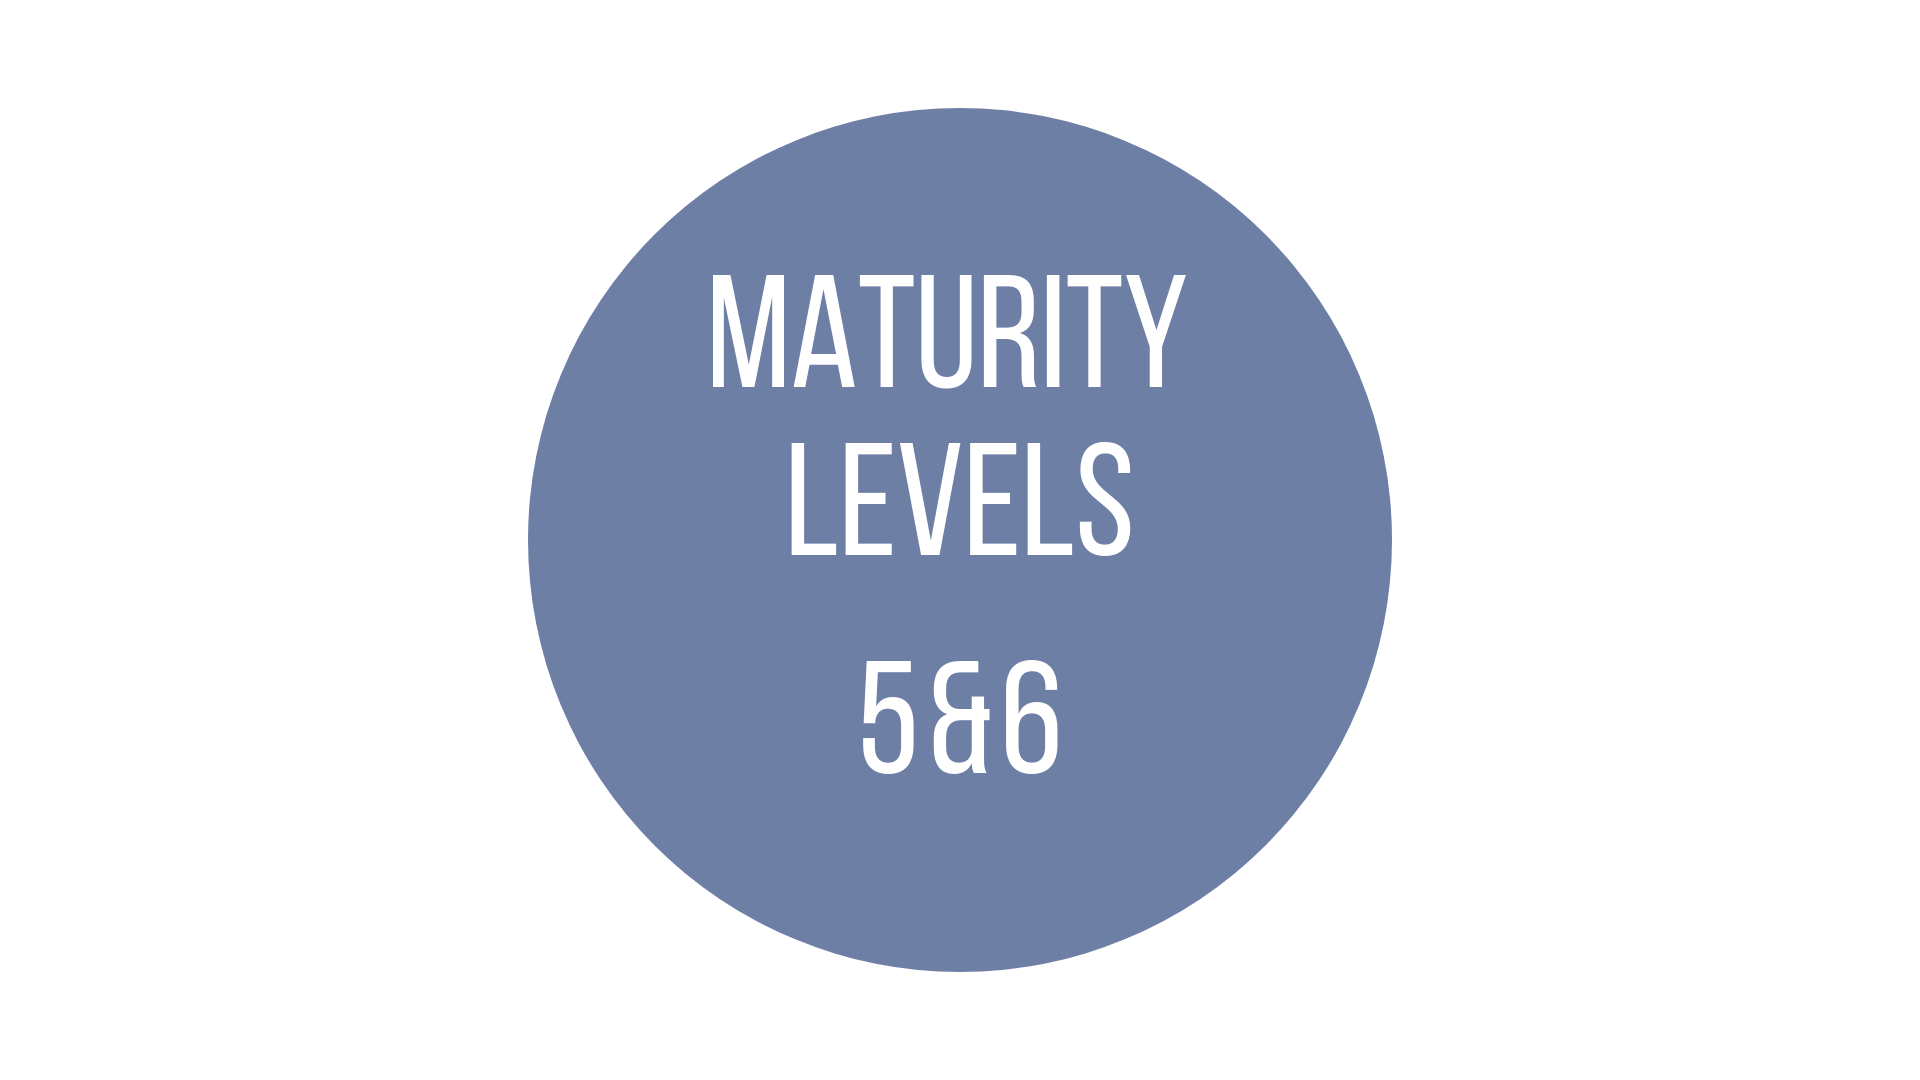
Maturity Levels 5 & 6 – Market Leader/Built for Survival
You should be extremely proud of yourself and your team if you managed to reach a point of maturity that allows you to look up to achieving the final couple of levels of the KMM. They are focused on building a robust process and ensuring long-term organizational survivability.
The last step you can take is to visualize fixed teams and floating workers (shared resources) across aggregated services with respect to visualization.
There’s nothing more to do on these levels regarding limiting WIP, so you can be confident that you’ve mastered them at this point of maturity.
What’s left is utilizing hybrid fixed-service teams and a flexible labor pool and aligning strategy and capability.
We offer the most flexible software platform
for outcome-driven enterprise agility.
In Summary
The Kanban Maturity Model is designed to map the implementation of all six Kanban practices throughout any organization.
While advancing through the 7 levels, you and your team will obtain a deeper understanding of your process and evolve it to become robust and antifragile.
Each level has a different focus, and Kanban software solutions can help you reach the top more quickly. Here’s the essence of each level of Kanban maturity:
- Level 0 - Oblivious: personal achievement
- Level 1 - Team Focused: collaboration and transparency
- Level 2 - Customer-driven: the flow of work
- Level 3 - Fit-for-purpose: agreement, customer service, respect, understanding, purpose, balance, leadership, regulatory compliance
- Level 4 - Risk Hedged: market focus, short-term results
- Level 5 - Market Leader: business focus, long-term investment, experimentation
- Level 6 - Built for Survival: business survivability, diversity, tolerance


 Visualizing work items on a basic Kanban board
 Kanban Team board with individuals’ swimlanes
  Applying WIP limits per user
 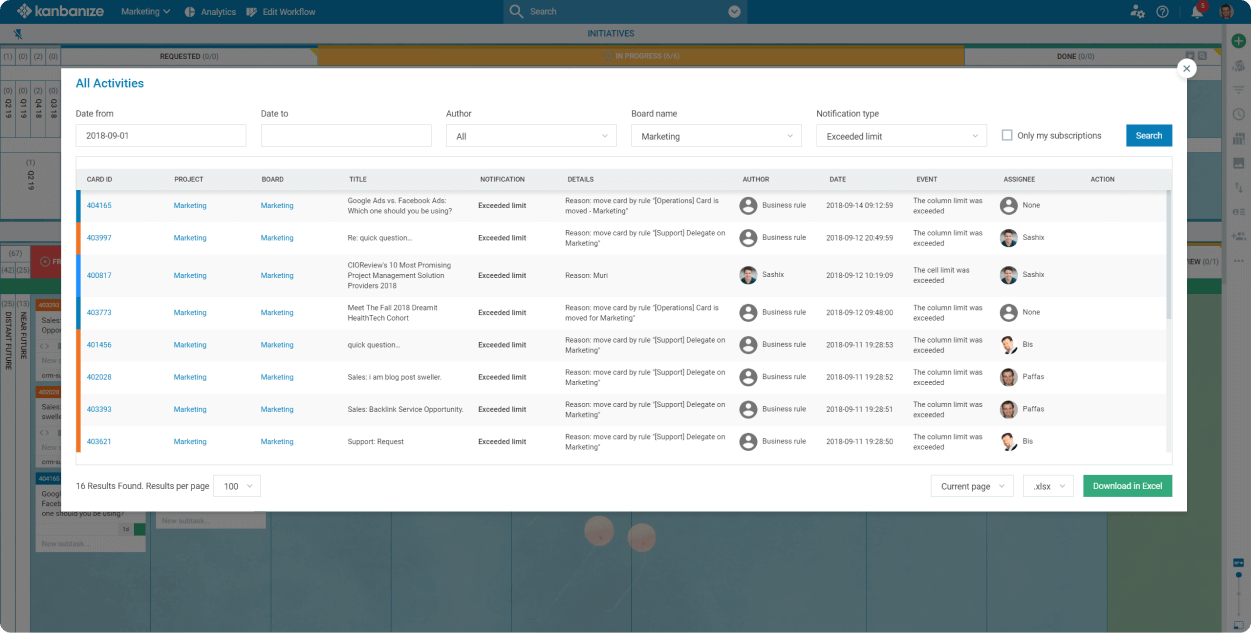 Visualization of all activities of a team per a given period
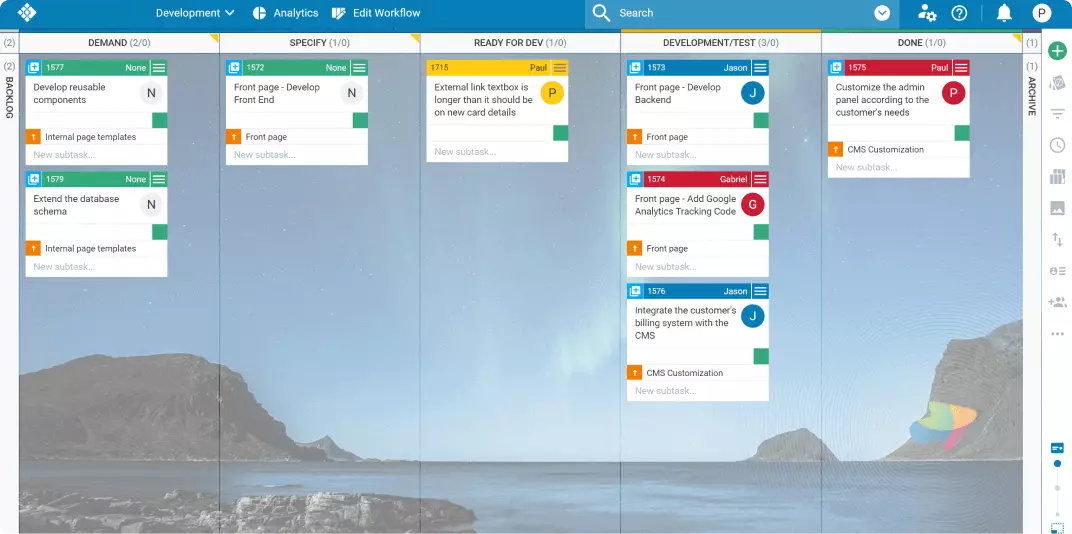 Example of a software development team Kanban board
 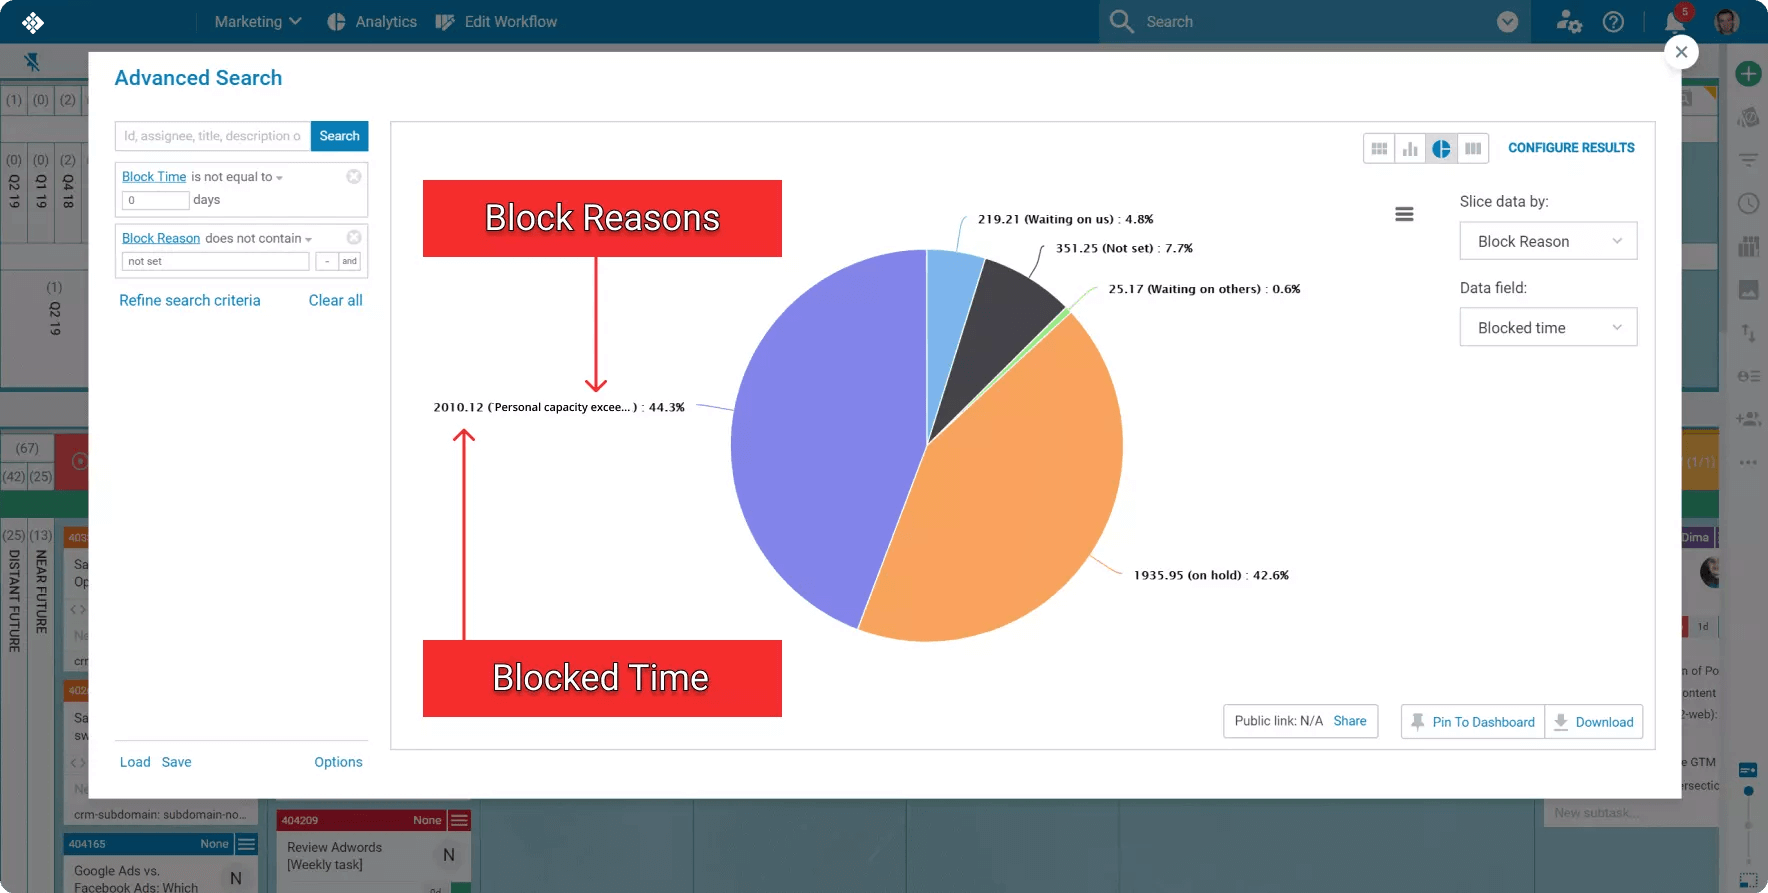 Search report of blocked cards
 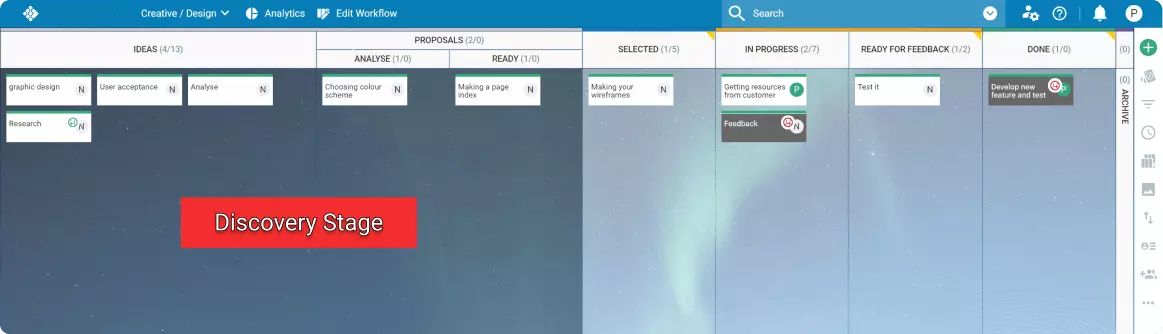 Visualization of the discovery stage on a Kanban board
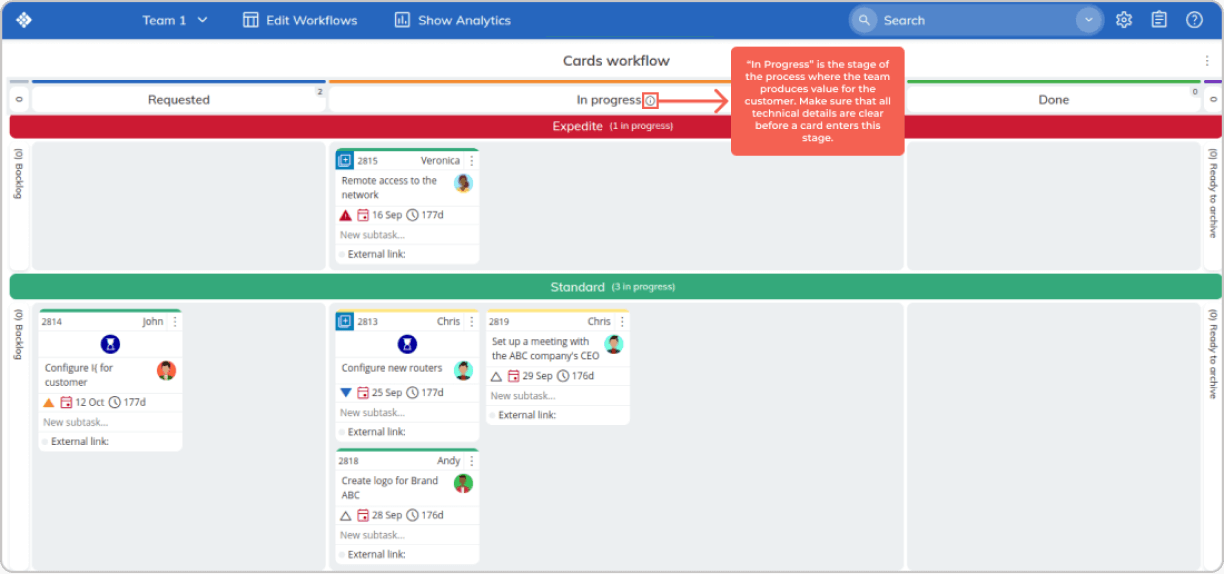 Visualization of work policies on a Kanban board
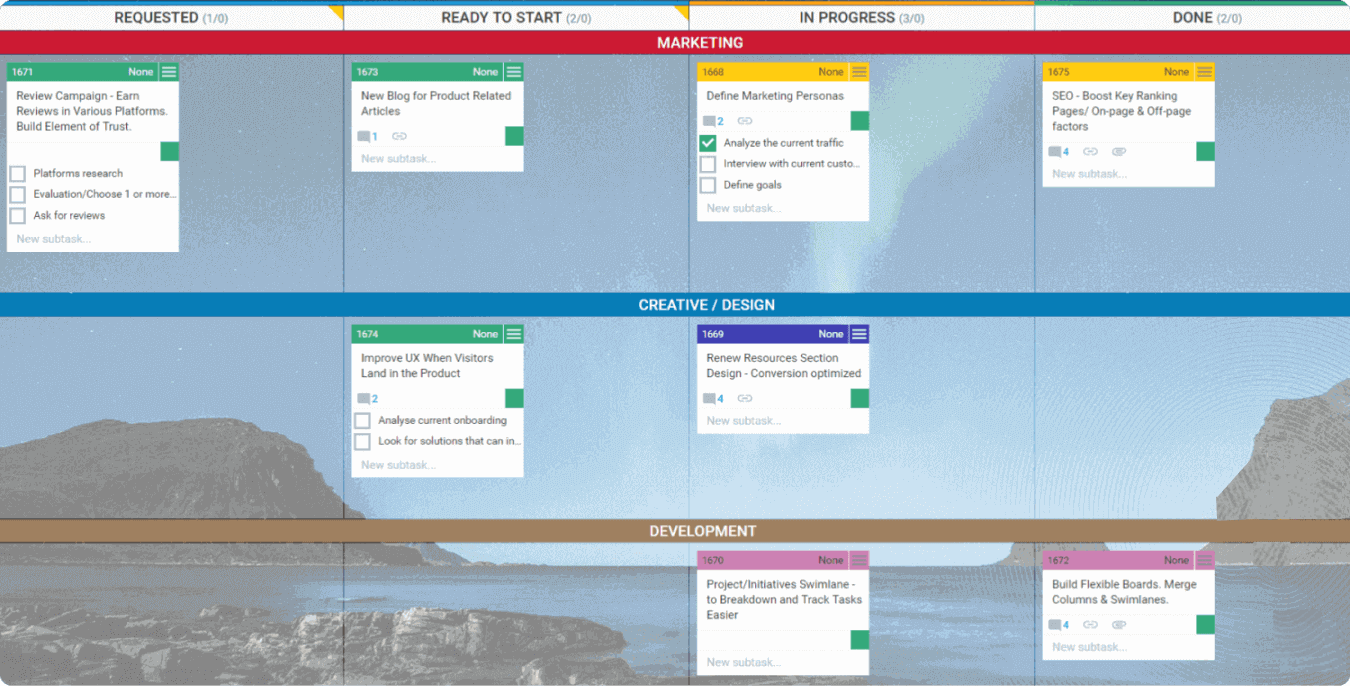 Visualizing different types of work on a team-level Kanban board
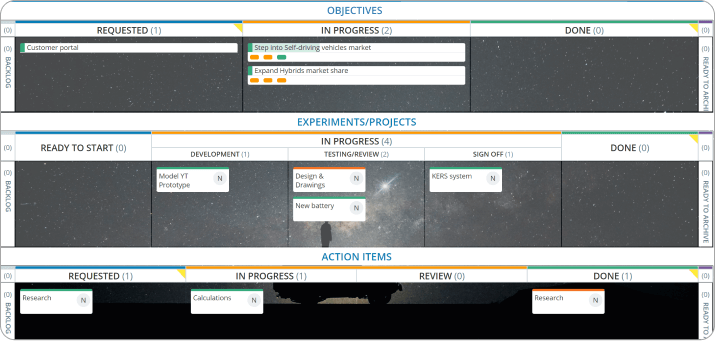
 Using card types to define work types based on customers’ requests
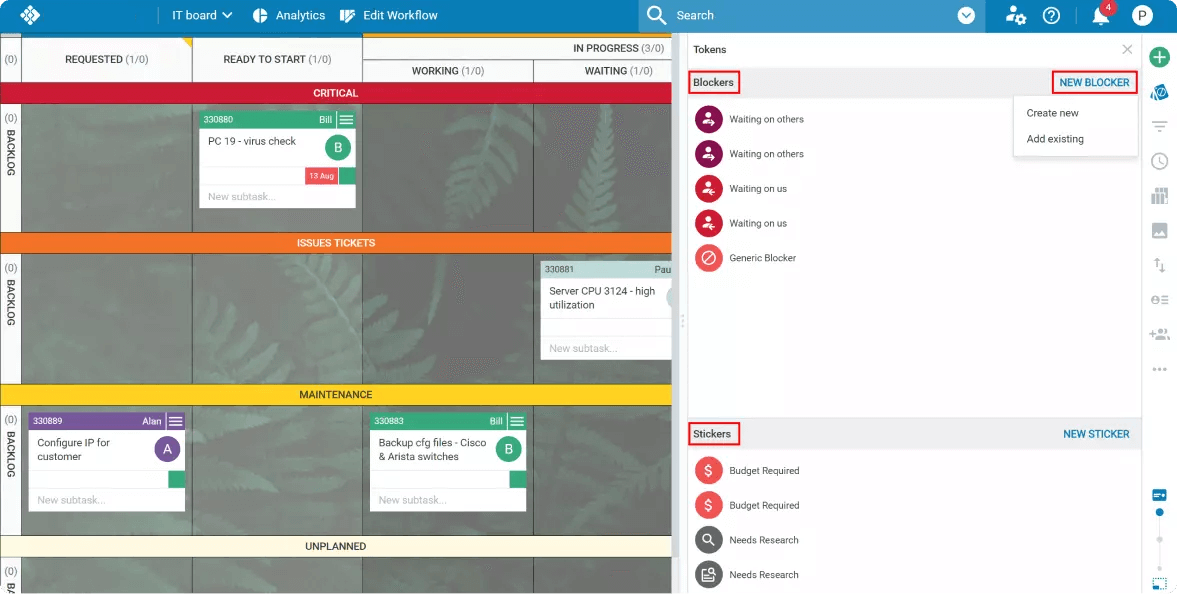 Using blockers and stickers for managing blocking issues
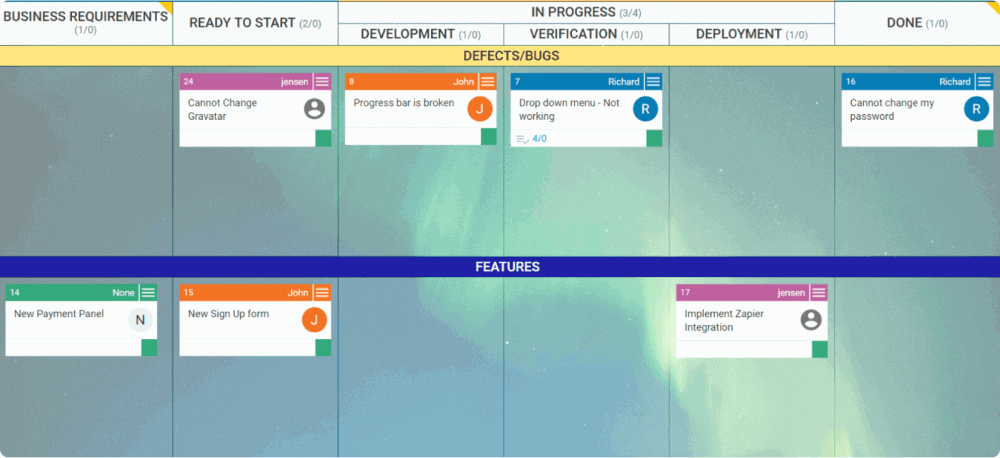 Visualization of work types using swimlanes
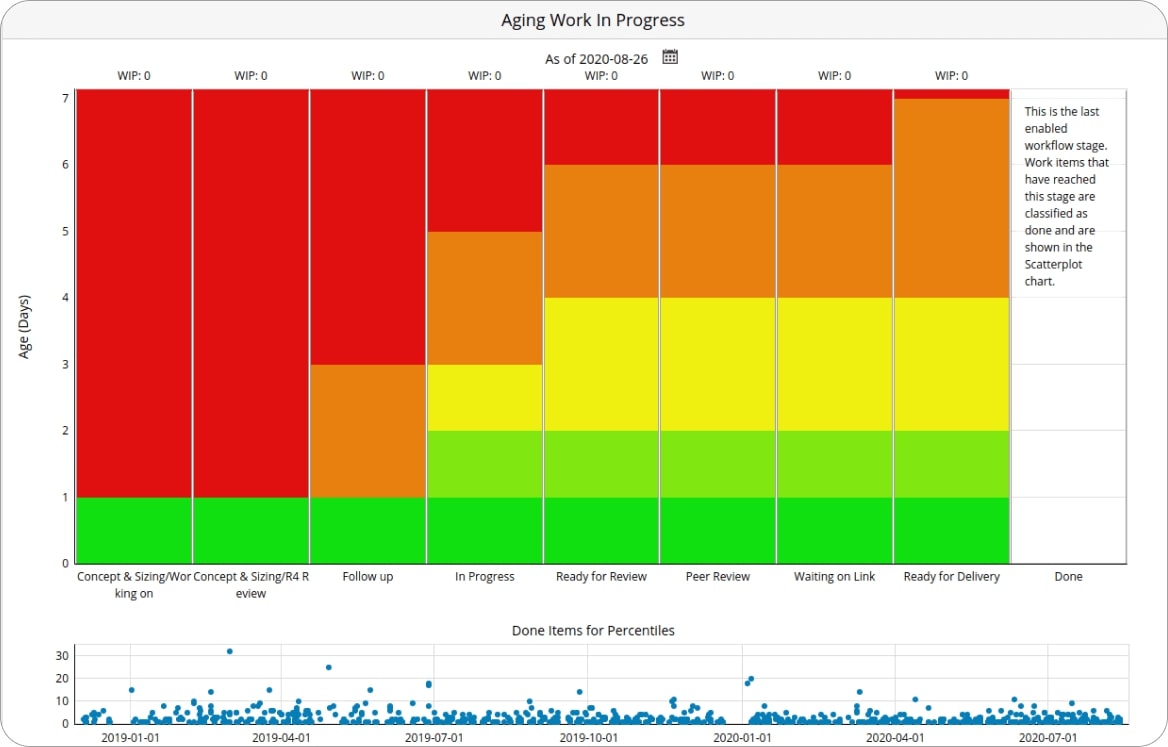 Agile work in progress (WIP)
 Visualization of a Kanban board at Maturity Level 3
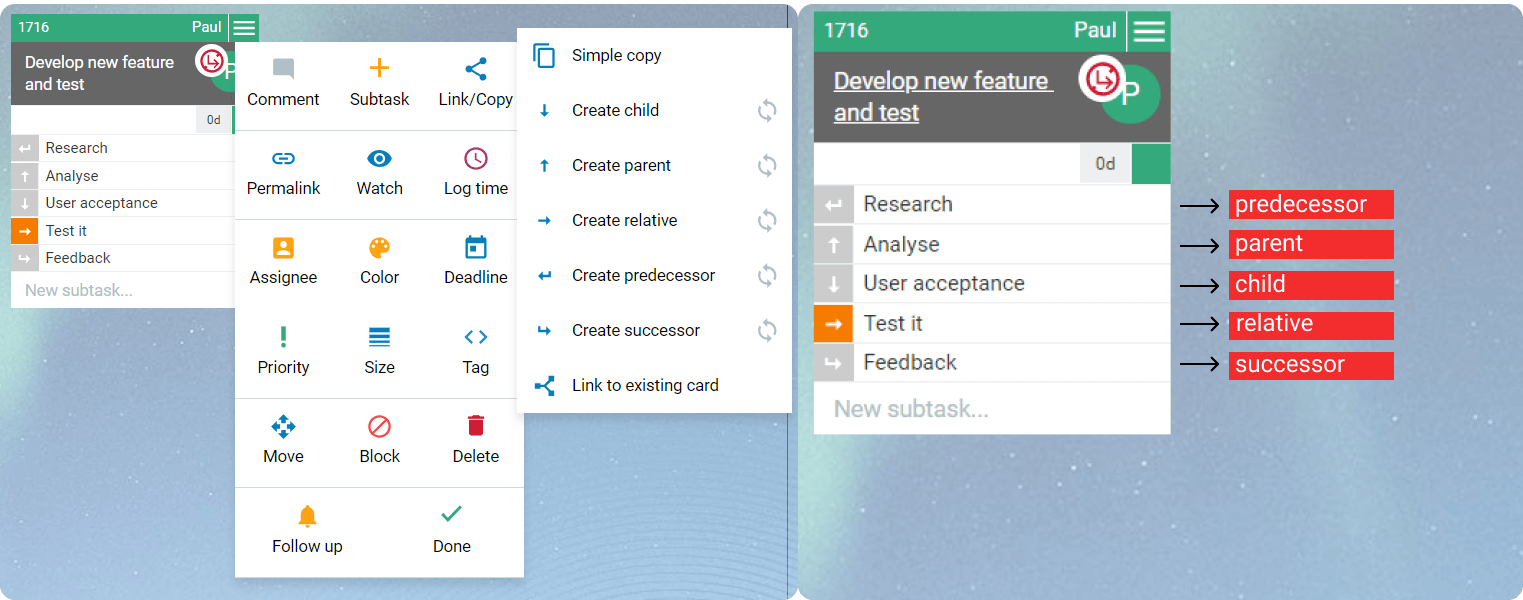 Hierarchy visualization of Linked Cards
 Breaking down the “Requested” area for better visualization of the work items that await to be worked on.
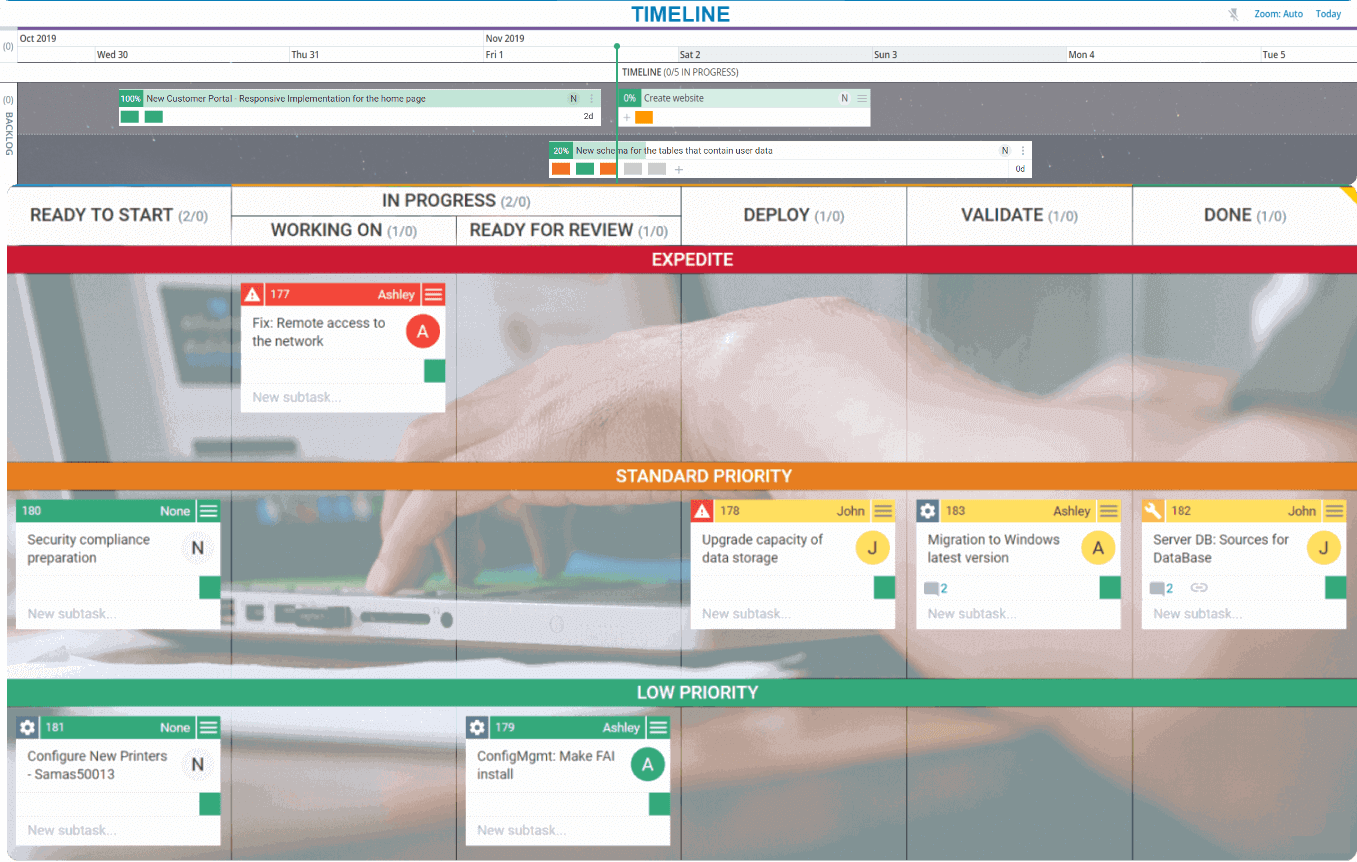 Using Kanban swimlanes to visualize different classes of service
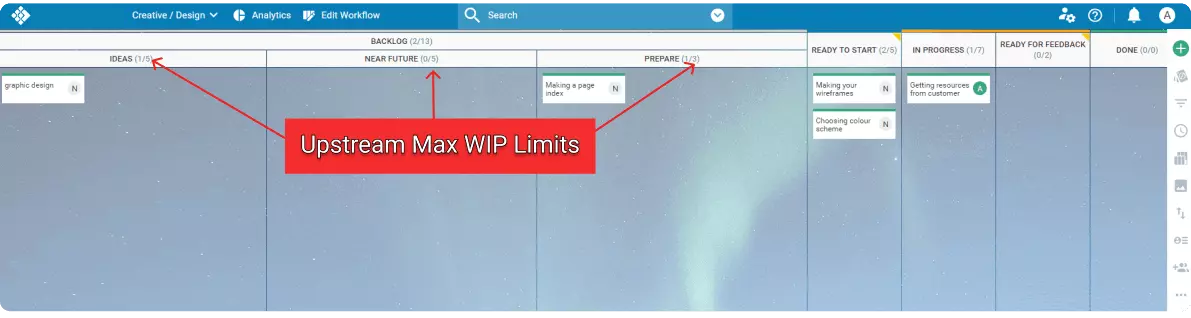 Setting a maximum limit on the work items in the upstream process of a workflow
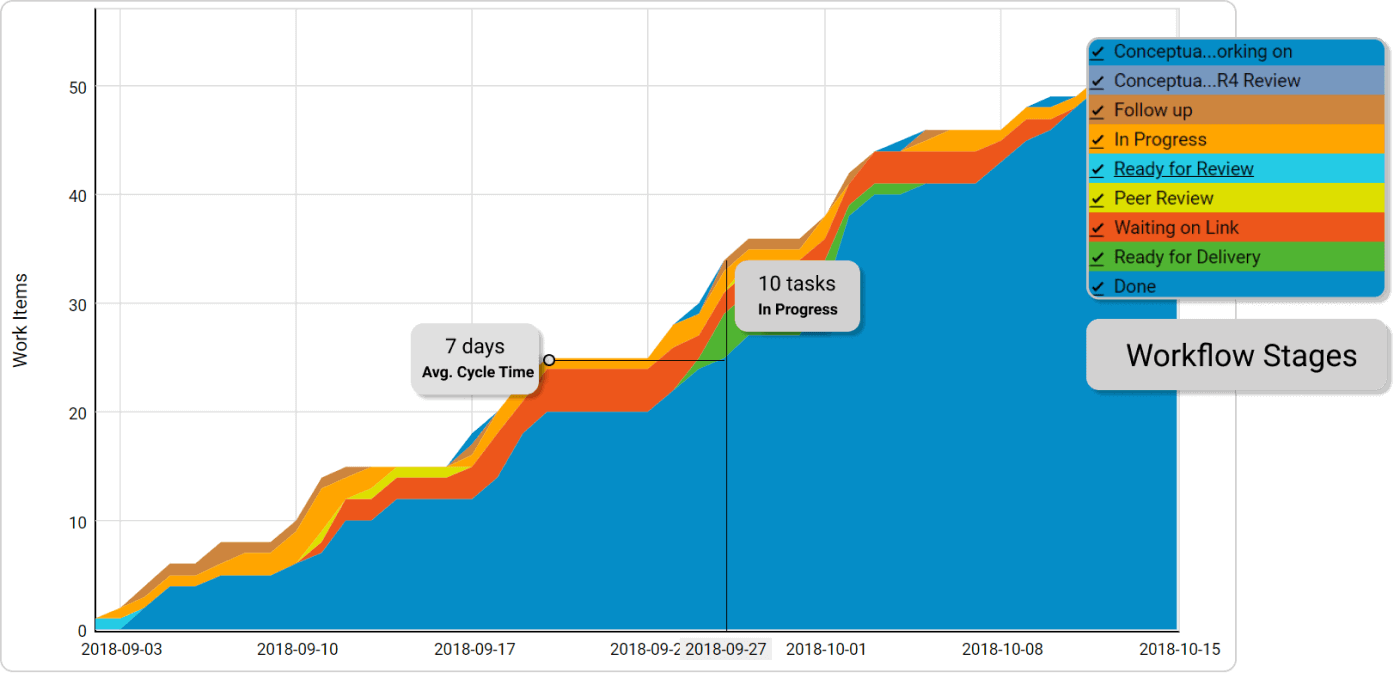 Managing workflow’s stability using a Cumulative flow diagram
 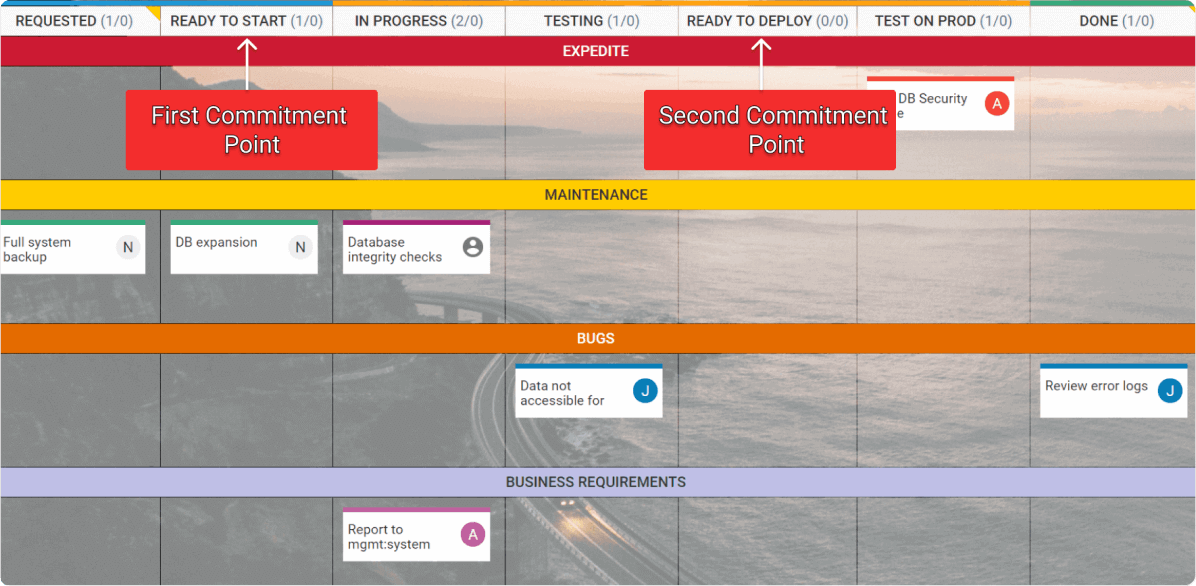 Visualization of commitment points on a Kanban board
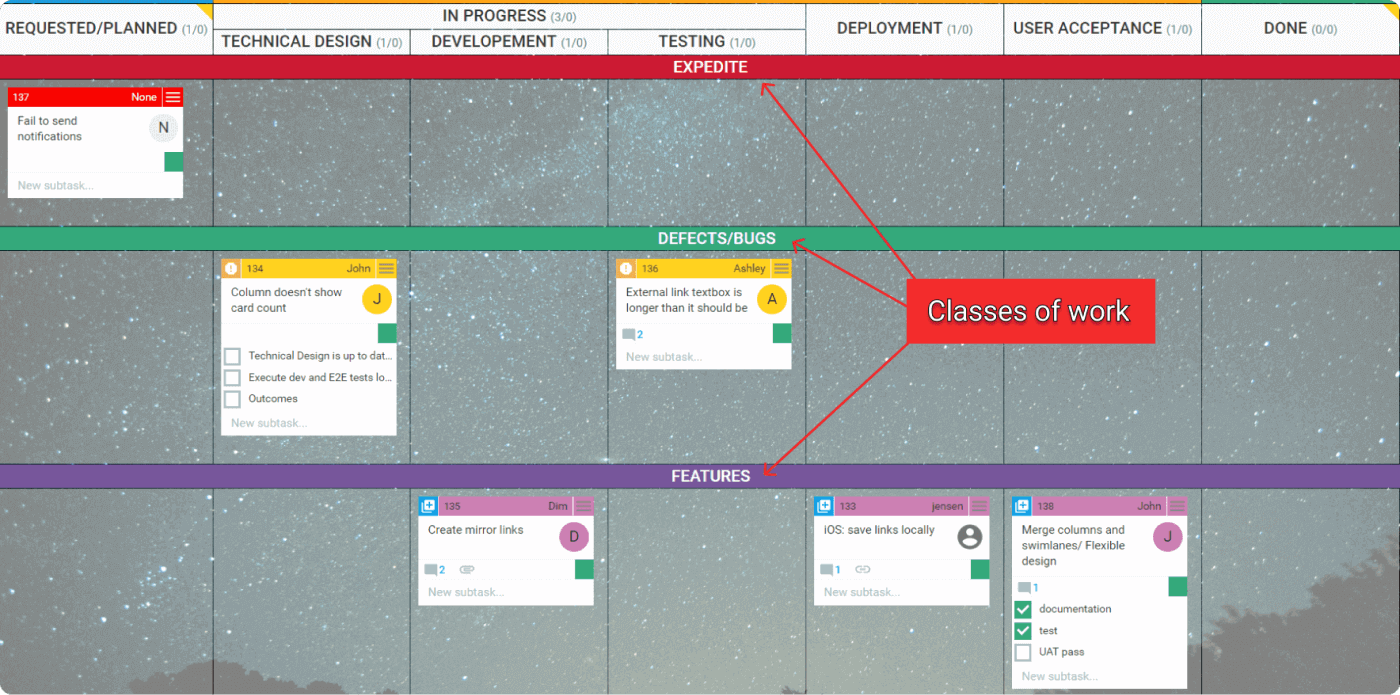 Visualization of classes of services using swimlanes
 Visualization of lead time spent in each process step
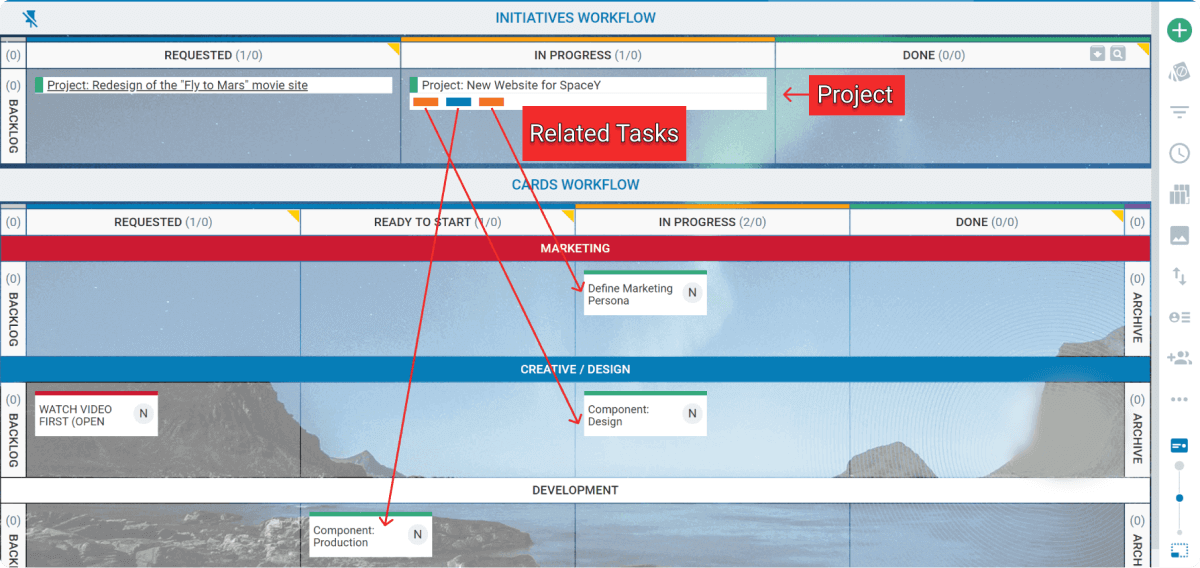 Visualization of a project broken down into work items across different teams via swimlanes
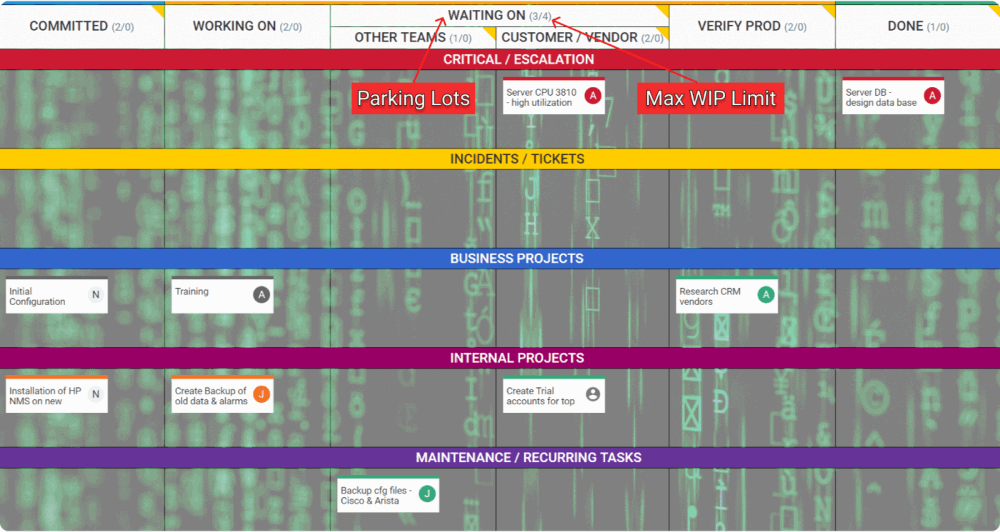 Visualizing WIP limits on the dependencies parking lot
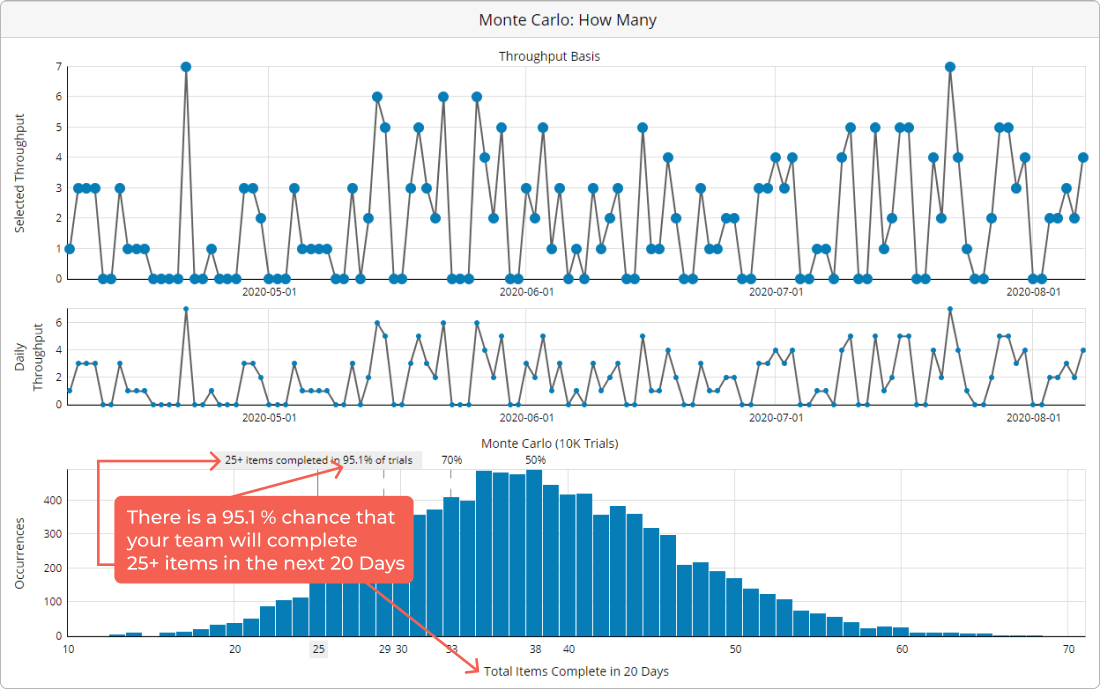 Example of Monte Carlo: How many?